
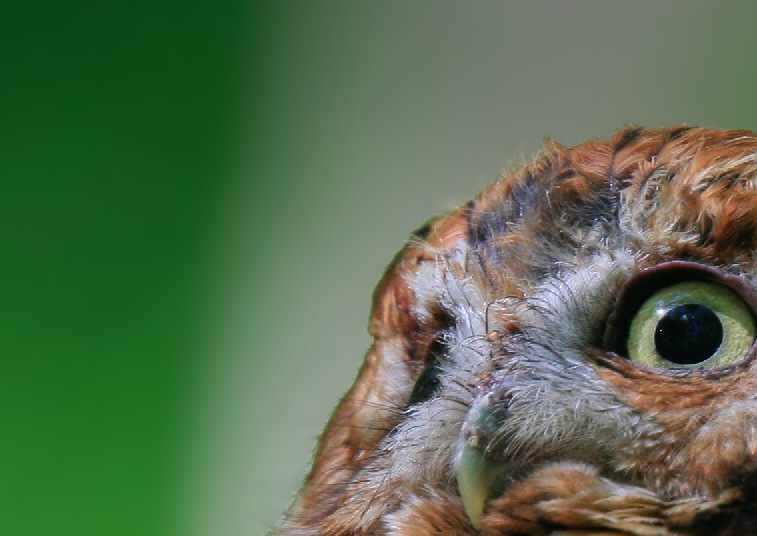
 Tutorial: Photoshop Basics This tutorial gives a quick introduction to simple photoshop processing for bird photos. The emphasis in this first article is on helping novice Photoshop users get up-and-running as quickly (and painlessly) as possible. Later articles will delve into more advanced techniques. As you probably know, there are a number of cheaper alternatives to Photoshop for processing digital images. Indeed, when I started out in bird photography, I at first did all of my post-processing using the built-in software in Mac OS X (a simple utility called "Preview"). This was more than adequate for performing crude adjustments to the brightness, contrast, and color of my images, and because it was fast (and free) I used it for some time. When I finally migrated my workflow over to Photoshop, the quality of my portfolio improved 500% --- no kidding. This is the single most impressive piece of software I have ever encountered, and that's saying a lot, coming from a computer scientist! I would even go so far as to say that would-be bird photographers on a limited budget would be better off buying a cheaper DSLR camera plus Photoshop, than to forego the costly software and buy a more expensive camera with the savings. Much of the quality you will lose by buying a $1000 camera instead of a pro-level $4000 camera can be made up by investing in an $800 copy of Photoshop CS3, or even the watered-down $199 version which Adobe sells under the title "Photoshop Elements." Whoooooo Needs Photoshop? For this tutorial, our running example will utilize a photo of a rufous-phase Eastern Screech Owl which I photographed in the spring of 2007 during a trip to Huntley Meadows Nature Preserve just outside of Washington, D.C. The photo was taken with a Canon EOS 30D camera and a Canon 400mm f/4 DO lens with a 1.4x teleconverter attached (effective focal length: 560mm). The shutter speed was 1/250 sec (hand-held, image stabilized), the ISO speed 640, and the aperture f/5.6 (wide open). The image was shot in JPEG mode (which I no longer use), resulting in a 72 DPI image of size 2336x3504. A screen-shot of my Photoshop session with this photo loaded is shown below. 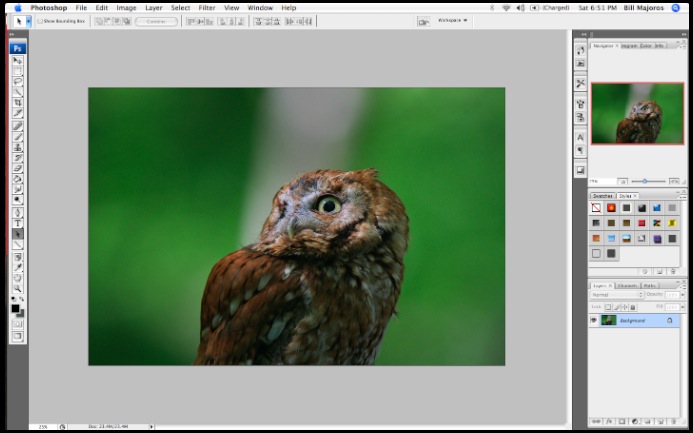 The first thing to notice about this photo is that the noise level is quite high (see image below). This is due to the fact that I was shooting at ISO 640 using a Canon 30D. This model of camera is generally quite good up to about ISO 400. Beyond that you begin to see some speckling in the smooth background areas of the image. Since I wasn't using flash back then, I relied on the higher ISO settings to attain a sufficiently fast shutter speed to freeze any motion (of the subject or the camera). The zoomed-in view below illustrates the effects of high-ISO noise: 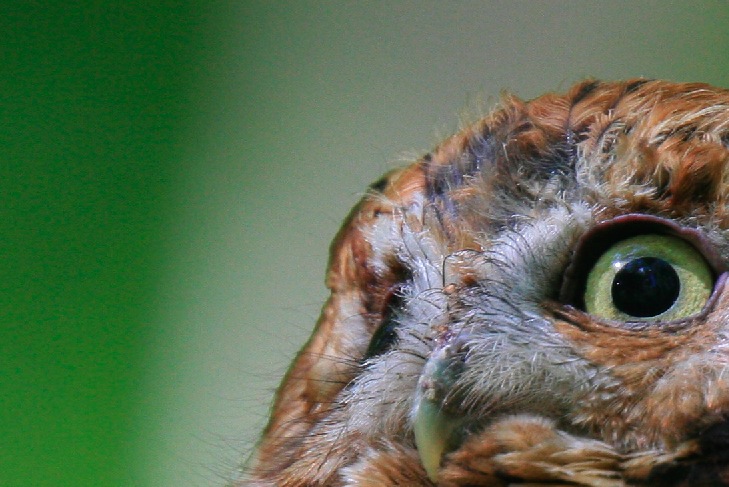 It's hard to see any noise in the subject, but in the background you can easily see the speckling (especially in the field of green) caused by high-ISO noise. We can remove that noise in software. Let's see how. Come On, Feel the Noise! We'll being by naively trying to apply a noise filter to the entire image. This isn't a good idea, but it's useful to illustrate why. Below you can see the dialog box for the Filter > Noise > Reduce Noise menu option. I've turned the noise reduction parameters all the way up, just to see how much noise can be removed using this tool. 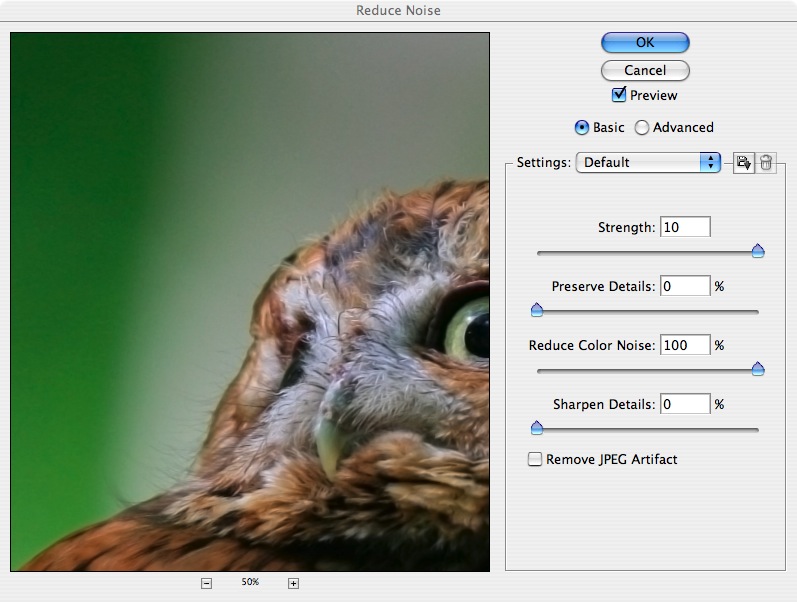 As you can see, the noise
has been reduced somewhat,
but not entirely eliminated:
there are still a number of prominent speckles in the field of green on
the left. (And just in case you're wondering, yes I did try the
"Remove JPEG Artifact" option, but it ended up increasing the noise
level, so that's no help for this image).
Most importantly, notice that the noise filter has introduced a fairly significant amount of blurriness to the subject's face. That is totally unacceptable. Although blurriness in bird photos can, in special cases, be acceptable, for most cases it is not. Viewers generally want to see as much feather detail as possible. As you can see above, the most aggressive noise reduction settings reduced the sharpness of the bird, without completely eliminating background noise. We need a better solution. Separation Anxiety The trick in situations
like this (and indeed, in the great majority of postprocessing tasks
for bird photos) is to separate
the bird from its surroundings --- i.e., to process the foreground and
background elements of the image separately.
Since noise tends to be most apparent in smooth background regions, we
want to focus our noise-reduction efforts on just those background
regions. Unfortunately, this step often requires some pretty
substantial effort on the part of the user.
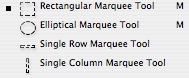
Photoshop provides an exasperatingly large number of options for selecting regions of an image: 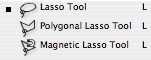
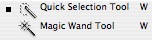 I always start out with the Quick Selection Tool, which looks like this in the Tools dock (on the left side of the screen in Photoshop):  With this tool you can
drag the cursor over contiguous regions of an image spanning the
subject to be selected, and the tool will automatically find the
nearest enclosing high-contrast edges to bound the selection.
Although the tool does make mistakes, it is often amazingly accurate in
finding the edges of the bird, as you can see below. For this
example I literally spent less than 10 seconds waving the mouse cursor
over the interior of the bird's silhouette, and the Quick Selection
Tool correctly inferred that the region I was interested in selecting
was the area enclosed in dotted lines below:
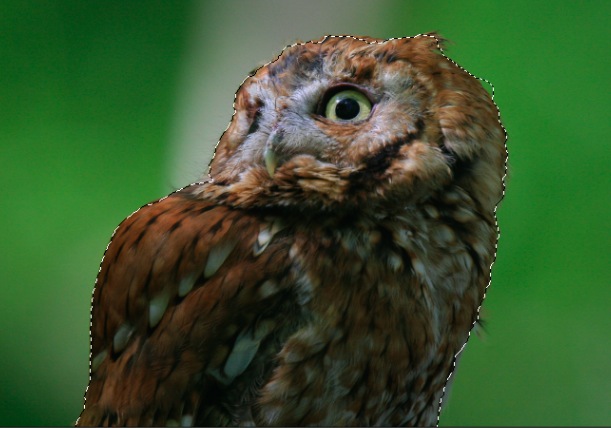 Unfortunately, as you can
see, the Quick Selection Tool is not perfect. In this case, it
has left out the "ear" tufts and erroneously included a small section
of the green background at the back of the head; some other smaller
errors can be seen by zooming in on the boundary of the selected region
(via the Zoom tool, or by pressing Cmd-+ on the Mac).
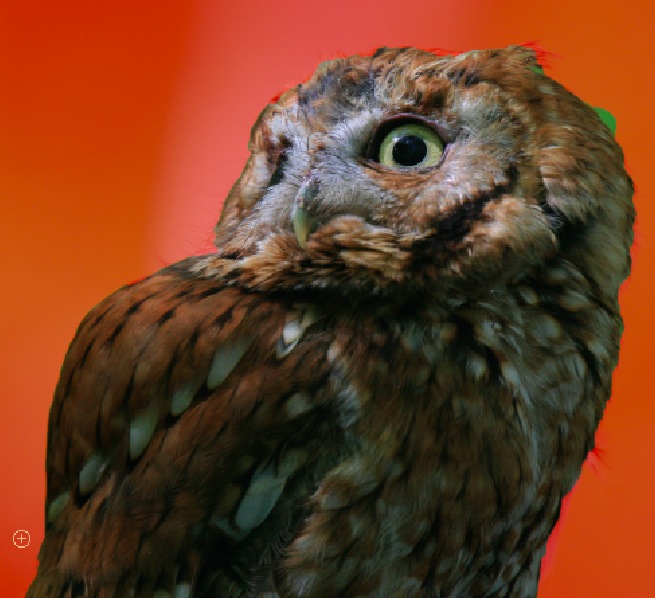
Mask of the Red Death Through much trial and error, I've found that the quickest way to correct the errors of the Quick Selection Tool is via the Quick Mask. This tool can be activated very simply by clicking on the camera icon near the bottom of the tool dock on the left side of the screen in Photoshop:  The effect of clicking
this icon is to cause all of the non-selected regions of the image to
be highlighted in red, as you can see below:
 By switching into the Brush Tool (by simply pressing the "B" key on the keyboard), we are
now ready to begin fine-tuning the selection created via the Quick
Selection Tool. You can also invoke this tool by clicking on its
icon on the tool dock (on the left of the screen in Photoshop).
The Brush Tool icon looks like this:
 Once the Brush Tool has
been invoked, its tool-specific settings palette will be visible at the
top of the screen:
 The most important setting
(given the defaults) is the brush size, which can be changed by
clicking the drop-down "Brush:" menu:
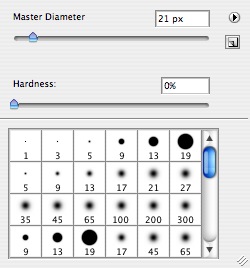 You can either select a
diameter via the slider bar at the top of this dialog box, or by
clicking on a particular brush at the bottom. In either case, the
effective size of your brush will be indicated by a circular cursor:
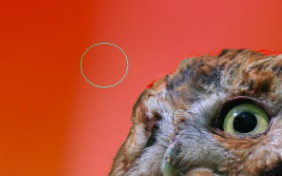 Obviously, you'll want to
choose a small enough brush to be able to attend to the details of the
subject. Below you can see that I've zoomed in (via the Cmd-+
keyboard shortcut on the Mac) on a section of green background which
the Quick Selection Tool erroneously included in the selection:
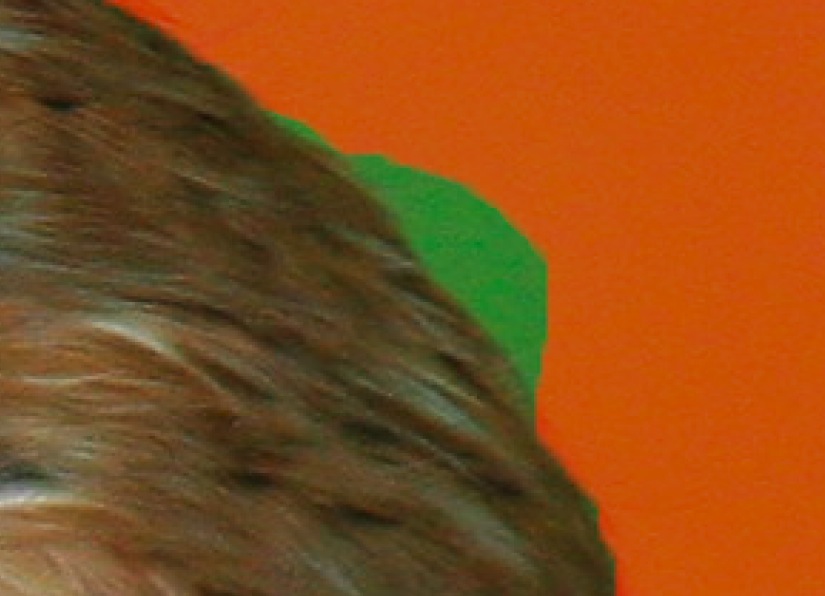 Using the Brush Tool, I've
painted this green "lump" out of the Quick Mask selection; you can see
a snapshop of this process below (the circle is the mouse cursor
representing the brush I'm using to do the painting):
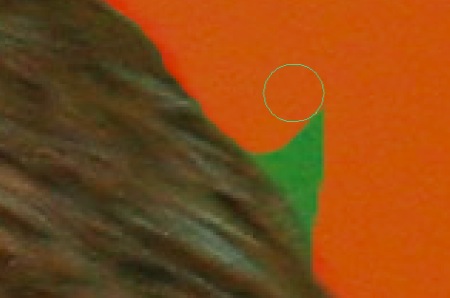 If I make any mistakes during painting I can quickly press the X key, paint over the area I accidentally made red (to remove the red from that area), and then press X again to resume masking. When I've finished painting red over the regions I don't want to be selected, I can click the Quick Mask icon again, or just press Q, to leave Quick Mask mode and convert the mask back into a normal selection. Using the Brush Tool within the Quick Mask mode of Photoshop, you can adjust the current selection as precisely as you want. If you're in a hurry you can do a rush-job of it, or if you're a perfectionist (like I aspire to be) you can spend all day at it. By zooming in further and further you can see with ever greater detail how the boundary of the selection marquee agrees with or differs from the boundary of the subject (an owl in this case) and continue at these successive levels of zooming to refine the selection. In the most extreme cases I've spent probably 20 or 30 minutes painstakingly tracing the outline of the bird in Quick Mask mode, though on average it only takes probably 5 or 10 minutes, or even less. However long it takes, it's more than worth it, as I think you'll see. Note that when working at
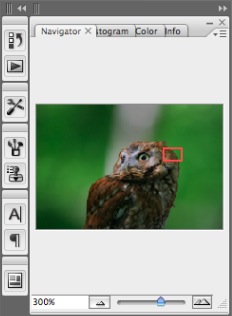
these
highly-zoomed in scales, it's useful to use the Navigator palette
(docked on the right in Photoshop) to move around in the image, without
having to constantly zoom out and back in again every time you're
ready to move to another part of the bird. The tiny red rectangle
in
the Navigator shows you what part of the image is currently visible in
the main window:
 Of course, you can always
just use the scroll bars in the main image window instead of the
Navigator, if that's easier for you.
Channels, Layers, and Selections The reason for expending
all of this effort in reducing the image noise is to try to achieve a
smooth background. The trademark of many pro bird photographers
is the prominent bird with a smooth background that doesn't distract
the eye from the subject. With enough light and an expensive pro
camera body (and an expensive lens), such smooth backgrounds can often
(though not always) be obtained directly out of the camera. Even
with the best equipment, however, in poor lighting the photographer is
generally forced to increase the ISO speed, thereby increasing the
background noise. Expensive equipment doesn't totally eliminate
the need for occasional processing in Photoshop. Keep that in
mind when you buy your next camera.
Once the bird is selected, the first thing to do is to save the selection as an alpha channel: 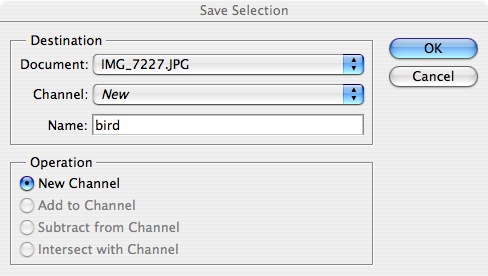 This dialog box is opened
via the menu option Select > Save Selection....
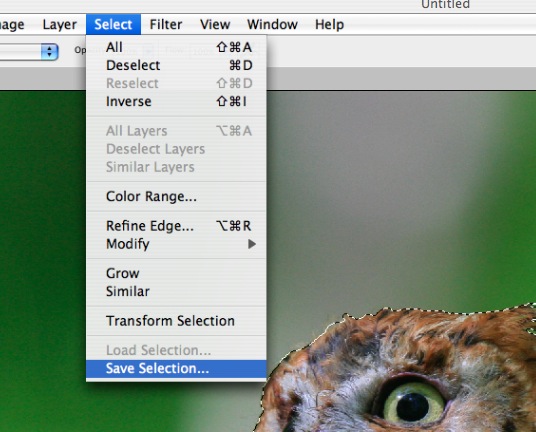 You can give the selection a name (like "bird" in this case), and it will then appear in your Channels palette (shown below). Channels can be saved with your image (if you save in Photoshop or TIFF format --- I recommend the former), so that your selections will be available next time you edit this file. 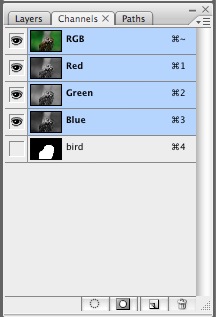 Later, during further
processing of the image, if you need to recall a selection you've made
previous and saved as an alpha channel, you can load that selection
again via the Select > Load Selection...
menu option, or by clicking the alpha channel in the Channels palette
while holding the Cmd key (on the Mac).
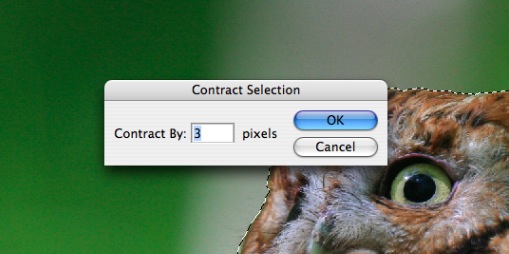
You can also invert the selection via the Select > Inverse menu option (Cmd-Shift-I on the Mac). In this case, the result is that the active selection will include only the background of the image, rather than the bird. This is precisely what we want to do right now since we're interested in reducing noise from the background, without also blurring the bird. Once we've got the background selected, it's a good idea to "back off" of the bird a little bit, because the noise reduction tool has a sampling radius that can extend over the boundary of the selection, resulting in color bleed (often visible as a "halo" effect around the subject). Below you can see that I'm using the Select > Modify > Contract... menu option for this purpose. 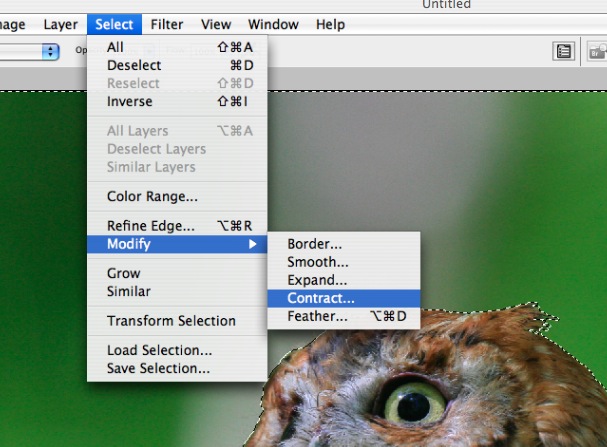 This brings up the Contract Selection dialog box
(below). For full-resolution images I typically contract the
background selection by about 5 or 10 pixels, whereas for images that
have already been down-sized for internet distribution I'll choose 2 or
3 pixels.
 Once the background is
selected, we can create a new layer containing just the background,
using the Layer > New > Layer via Copy
menu option. This results in a new layer appearing in the Layers palette (docked on the right
in Photoshop):
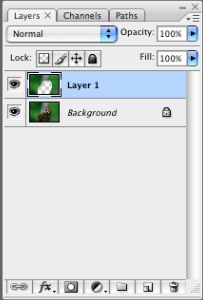 Creating a new layer for
the background like this is just another convenient way to separate the
elements of the image that we wish to process differently from the
other elements. For some tools (like Reduce Noise and Gaussian
Blur) this can also help to further reduce the incidence of
"bleed-over" when those tools are sampling with a large radius that may
extend past the selection border; since the subject has been totally
removed from the background layer, the noise and blur tools can't
possibly sample pixel colors from the bird when we're processing just
the background layer. A further safeguard that I recommend is to
lock the transparent pixels in each layer, by clicking the checkerboard
icon next to the word "Lock:" in the Layers palette (see above).
The Smooooooth Operator Now we can (finally!) apply the noise reduction tool to the background. Making sure that the new background layer ("Layer 1" in the above figure --- don't confuse this with what Photoshop calls the "Background" layer, which is actually our foreground, since it contains the bird) is selected in the Layers palette, we bring up the Reduce Noise tool again: 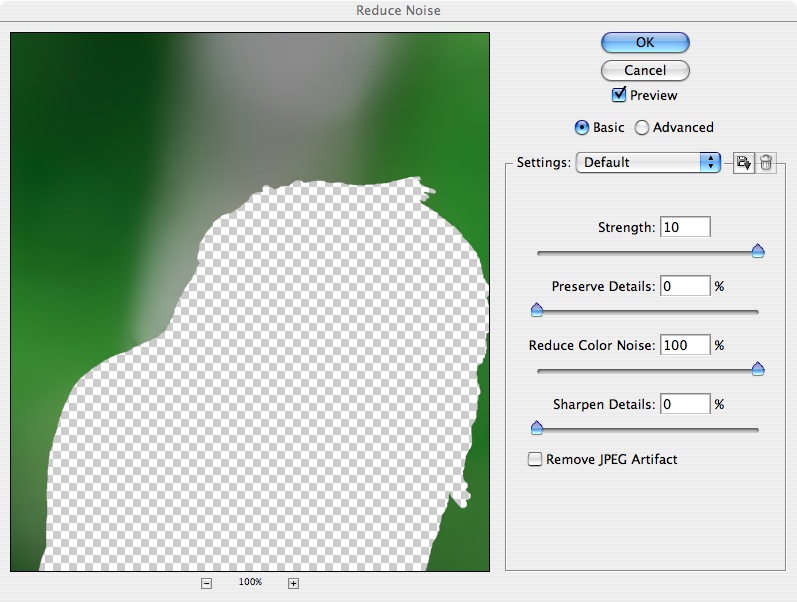 As you can see, the tool is now limited to the background region around the bird, since the active layer in the Layers palette is the background ("Layer 1"). For backgrounds I use the settings shown above (full strength for both types of noise), and then apply this tool four times in succession (!), to really, really, really reduce the noise. As you can see from the snapshot below, it really, really, really works: 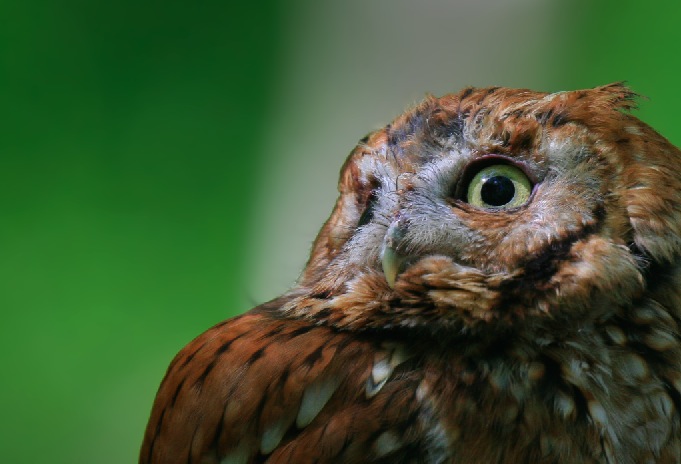 Instead of applying four
levels of aggressive noise reduction, you can achieve the same effect
by choosing Filter > Blur
> Gaussian Blur... from the menu, and choosing a reasonable
sampling radius for the blur (not too extreme in either
direction). Gaussian Blur tends to be faster than repeated noise
reduction, and can be used to achieve a greater variety of effects,
since you can simultaneously reduce noise and also blur away background
elements that would otherwise be distracting. Below you can see
that Gaussian Blur is definitely effective at eliminating noise in
backgrounds:
 Brightness, Sharpness, and Saturation It's sometimes useful to
also reduce the brightness of the background, so as to make the bird
appear more prominent in the image. There are many ways of doing
this. There's the Image > Adjustments > Brightness/Contrast
tool, which allows you to reduce the brightness via a slider.
There's the Image > Adjustments > Shadow/Hightlight...
tool that allows you to reduce the highlights, which is often extremely effective for making the
background less distracting. Here I'll instead use the Image > Adjustments > Levels tool:
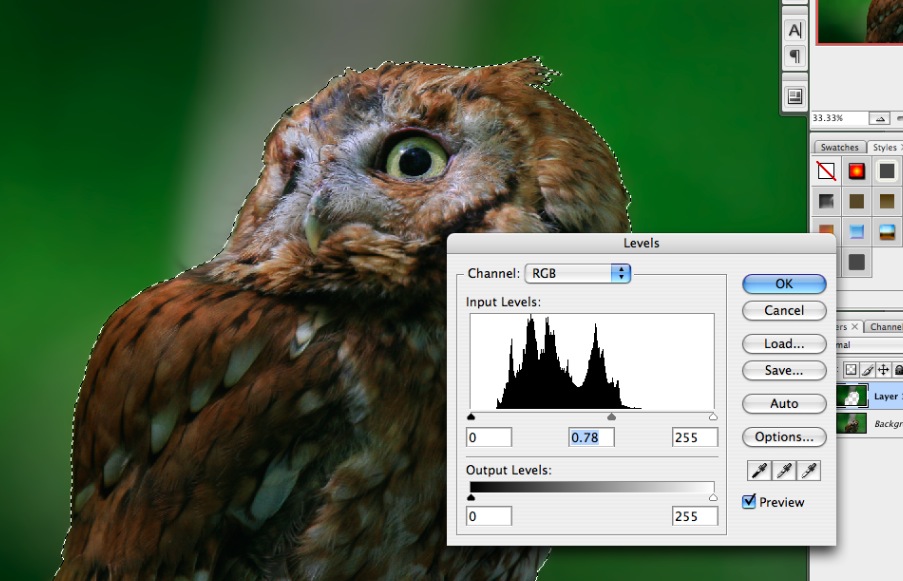 Here I've just moved the
little gray slider in the middle of the histogram's x-axis a little bit
to the right, so as to reduce the overall brightness of the background
layer. The Levels tool is extremely useful, and I generally use
it at least once for every image, either to darken the background, to
lighten the foreground (the bird), or to improve the overall contrast
of the whole image.
Returning to the foreground now, let's make the bird look a bit sharper. We'll of course have to clear the current selection and re-load the "bird" selection that we saved earlier as an alpha channel. Below you can see that I've then invoked the sharpening tool via Filter > Sharpen > Unsharp Mask.... This is the only sharpening tool I ever use. Sharpening is a black art, which means that it takes a lot of practice and is hard to learn from a book or tutorial. Most of the time I just tweak the top two sliders --- Amount and Radius. For full-resolution images I generally start out by trying a radius of 0.7 and increasing that to as much as 1.3 as I search for the best setting; for images already reduced for web distribution I always use a radius of 0.2. The Amount slider I vary between 50% and 500%. You need to twiddle these two sliders in tandem until you find a setting that looks good for your particular image. Just be careful not to over-sharpen --- over-sharpening and over-saturating are the two most common errors committed by novices. 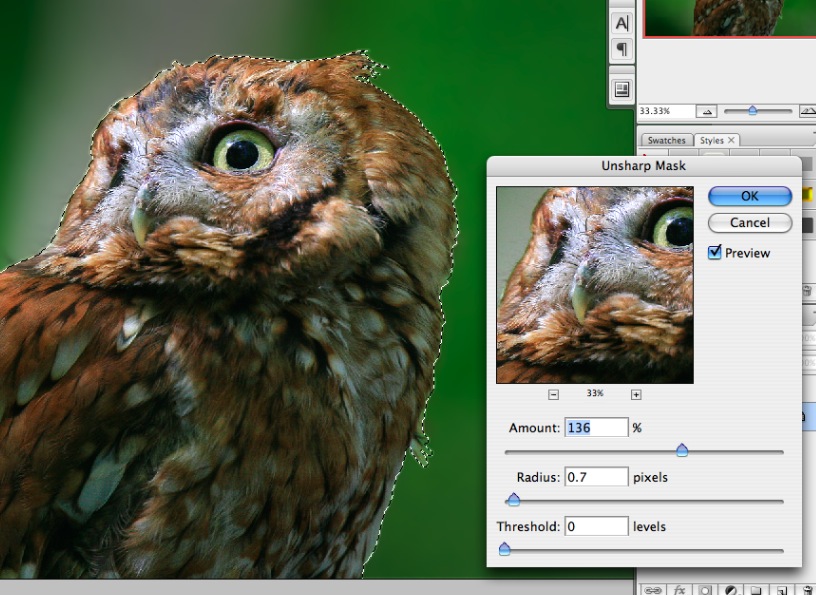 For this image I think a
tiny bit of saturation is in order for the bird. I rarely
increase the saturation in images, and sometimes I even decrease the saturation. Some
people like to severely decrease the saturation of the background in
order to make it less distracting, but I don't like this technique,
since I prefer to leave the color of the background unchanged and
instead just make it less bright and less detailed. I think it's
background detail that too
often distracts the eye, not background color.
Note that different cameras (and lenses) naturally impart different amounts of saturation to the image, so for your particular camera you may need to decrease (or rarely, increase) the saturation more than others. 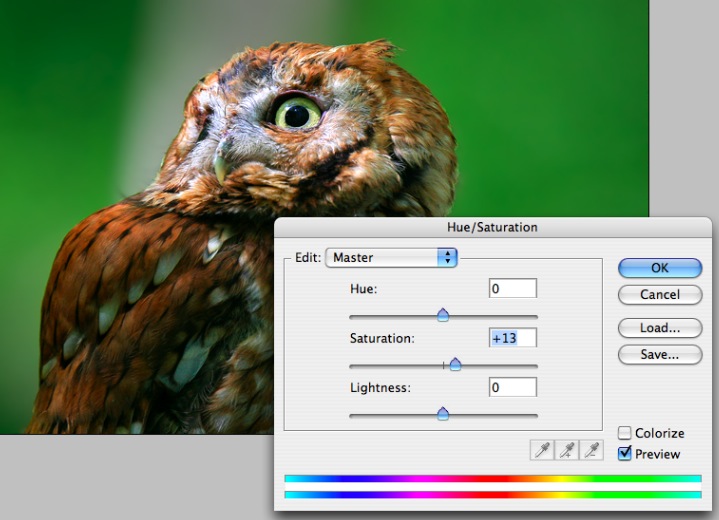 The saturation tool is available via Image > Adjustments > Hue/Saturation. Finishing Up Finally, let's sign the
image so that people who stumble on it via a "Google Images" search
will know who deserves credit for taking the photo. The Text tool (also called the "Type"
tool) is invoked by clicking on the "T" icon on the tool palette
(docked on the left in Photoshop):
 After positioning the
cursor and typing in the text, we need to select a color for the
signature. I like to choose a color which is very close
(chromatically) to the background where the text will lie, so that the
signature doesn't demand all of the viewer's attention:
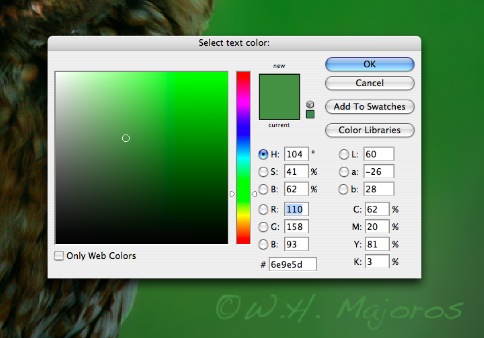 Here I've used the eye dropper tool to select the
background color by clicking on the green pixels behind the text, and
then adjusted the text color slightly upward (making it lighter) from
that color, so that it just barely stands out from the background.
Below you can see the final image: 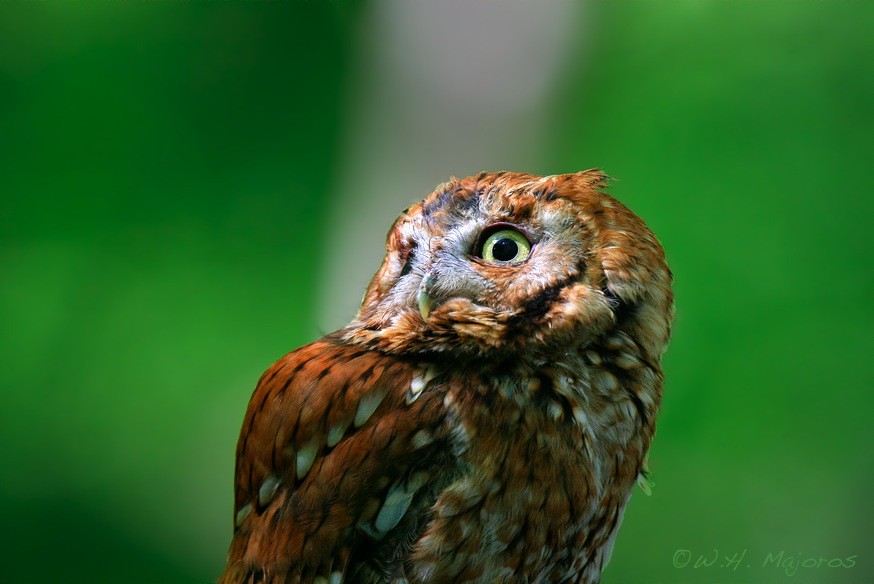 In this brief introduction
to Photoshop I've covered a number of different tools, so that you
should at least be aware of some of the things you can do to improve
your images without having to expend too much effort. The most
time-consuming task has been (and generally always is) the process of
carefully selecting the outline of the bird. Once this is done,
however, many tools can be applied to either the foreground or the
background to enhance the image, and these can typically be done very,
very quickly.
Despite the simplicity of
what I've shown you in this tutorial, Photoshop is capable of far more sophisticated image
processing than this. In the further installments of this series,
I'll go into much greater depth and cover a wider range of tools and
techniques for improving your bird photos.
Remember: Photoshop is for the birds! |