|
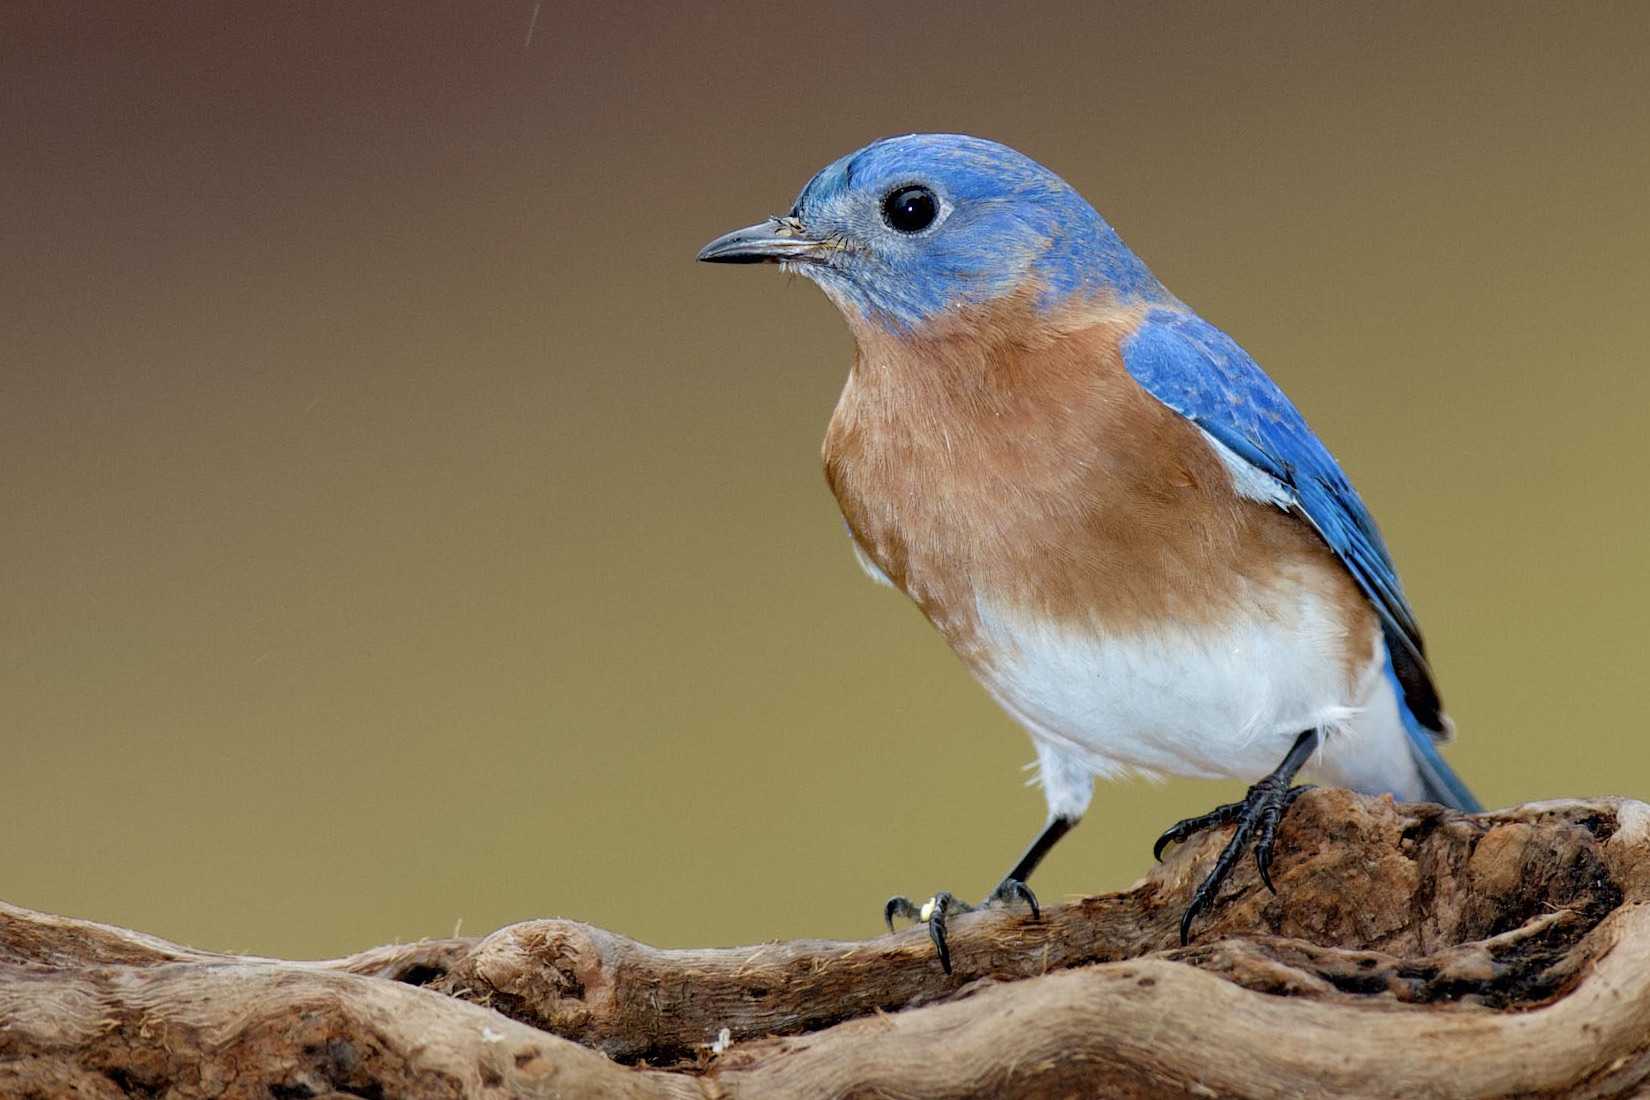
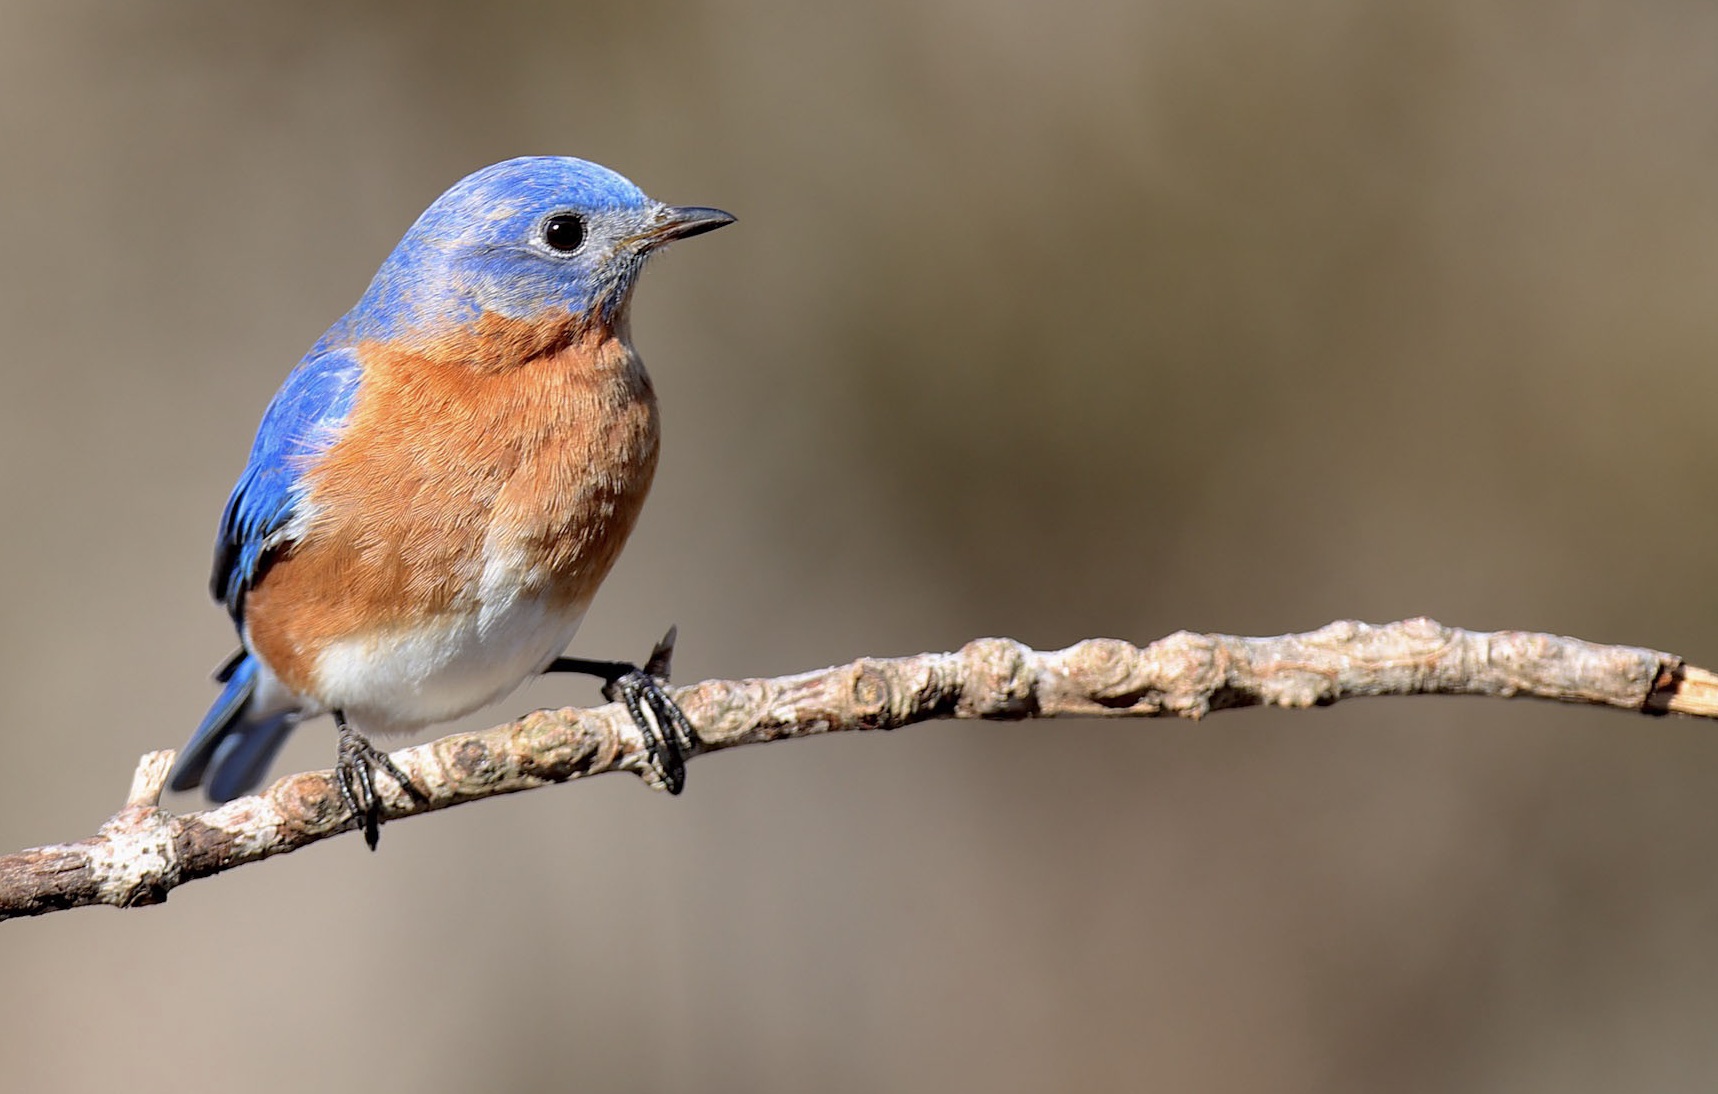
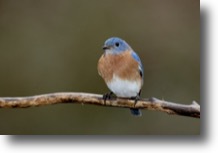
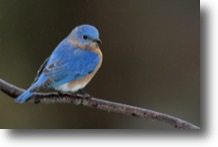
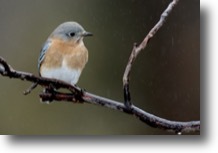
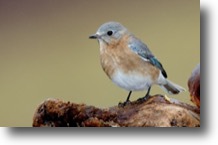
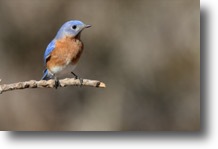
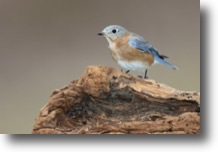
In early 2021 I took up bird
photography again, after an 8-year hiatus. This
Eastern bluebird is one of the first birds I shot
after dusting off my camera, a 13-year-old,
10-megapixel crop camera. In this article I
compare that camera to a brand new full-frame
model, and discuss some of the challenges involved
in shooting birds.
|
|
In
2013 a terrible thing happened to me — a thing
called grad school. Though I had once been
an avid nature photographer, it just wasn't feasible to continue with
my various hobbies anymore, now that I was a full-time student.
After finishing school I didn't pick up the photography again for several more years, mainly due to inertia. It's hard to get back into a challenging hobby after being away from it for a long time, because there's a lot that one has to re-learn. I wasn't even sure my gear would still work after all that time. High-tech equipment, like telephoto lenses and digital cameras, can have a high failure rate once they get old. |

|
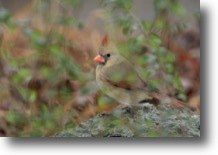
Female cardinal in the rain,
photographed with a 13-year-old, 10-megapixel crop
camera. Flash allowed me to light up what would
normally be a dull, dreary scene.
|
|
In 2021 I decided it was time to take up the
photography again. I wasn't sure it would work out, but
I figured I'd try anyway. My main concerns were
whether I'd remember how to operate my camera, and
whether my 13-year-old gear still worked.
I dusted off my old camera and lenses and checked that everything was still in working order. One of my camera's spare batteries would no longer take a charge, and the camera would no longer automatically switch over to the second memory card when shooting, but otherwise it all seemed operational. That was a relief. |
|
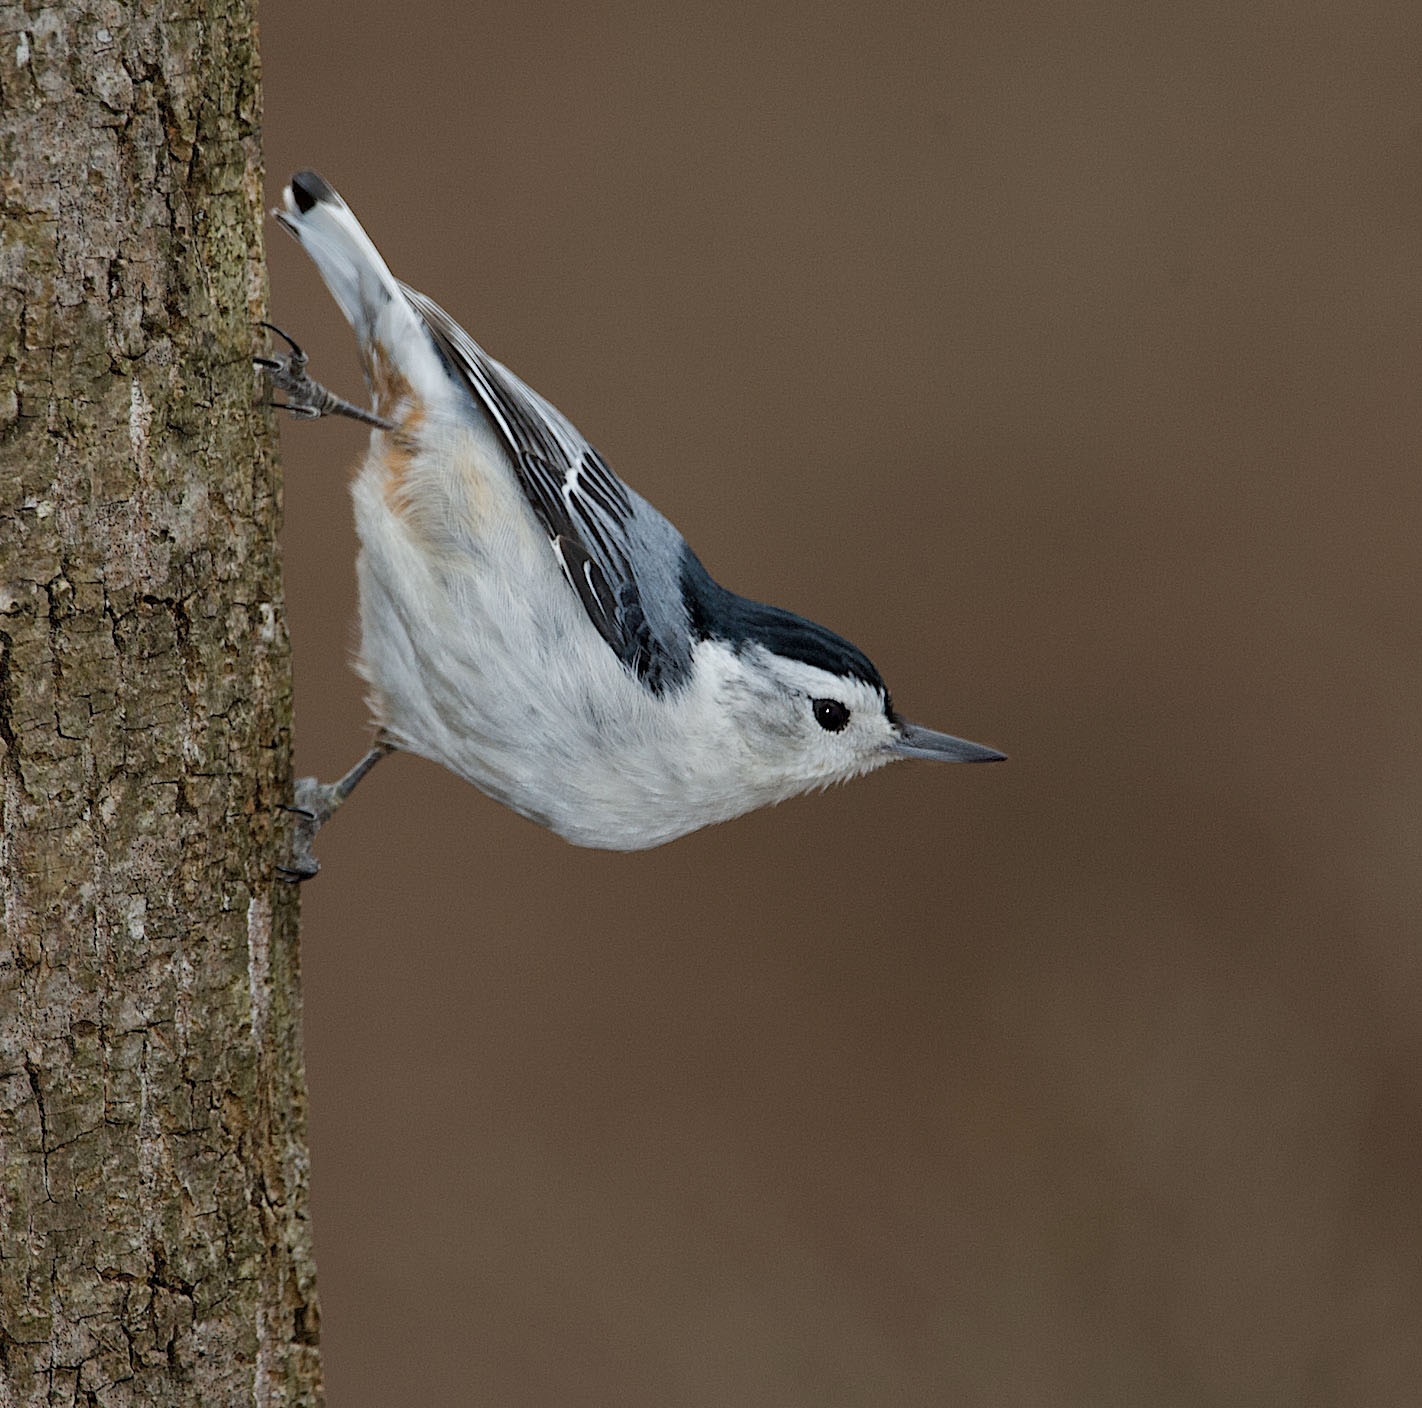
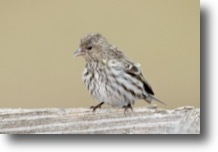
White-breasted nuthatch. Retaining
detail in large white areas is difficult. Flash
helps with that, because strong unidirectional
lighting accentuates microscopic details in the
feathers, in a way that ambient light doesn't
(because ambient light is omnidirectional). Photo
taken with a very old 10 MP crop camera.
|
|
My first chance
to really thoroughly test my old gear came on a
rainy weekend in February. The ice and rain made
it impractical to go to the local park, so I
decided to try shooting from home.
The problem with shooting birds from within your house is that you have to shoot through window glass, which severely degrades image quality. To get around that, I ended up turning my whole house into a bird blind: I turned off the heat, opened the window, and donned my warmest winter clothing. Wearing my big winter coat, my warmest hat, and my heavy gloves, I sat at the open window for 6 hours both days and shot birds in my yard. And I had a blast doing it! |
|
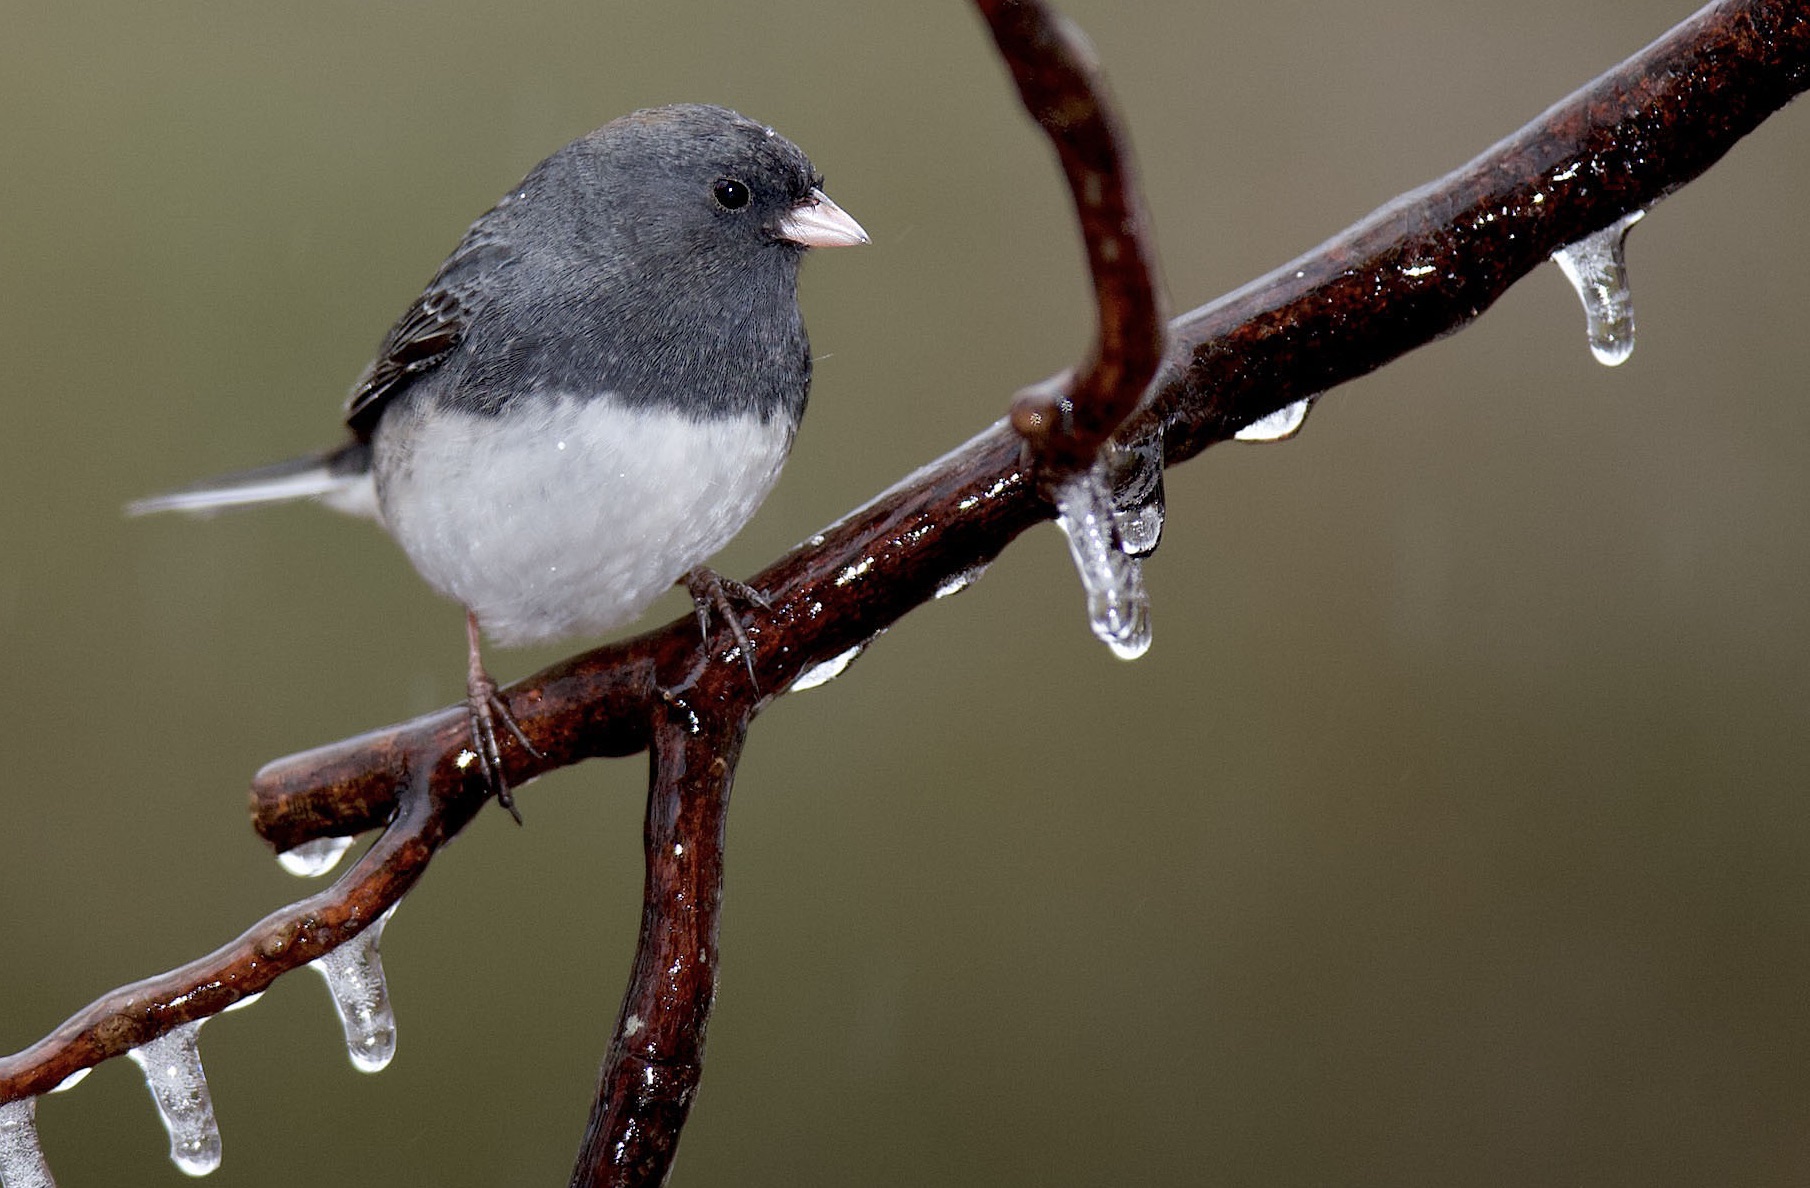
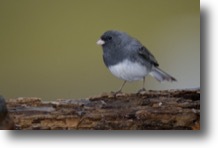
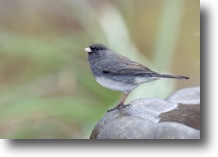
Northern junco in an ice storm. It was
a very dimly-lit day, but with flash I was able to
light up the scene enough to get a good exposure.
I did have to open my window to photograph this
bird in my yard, and it did get quite cold in my
house!
|
|
The great thing
about shooting birds at home is that you can
position the feeder close to the window, so that
you can get frame-filling shots that reveal minute
feather detail. I find that I can get much closer
to the birds that way than I would at the local
park or nature preserve, where the birds tend to
fly away as soon as they see me approaching.
My feeder is so close to my window that my lens sometimes can't focus on
the birds. For that reason, I use an extension tube,
which allows my lens to focus closer. I also set the
range limiter switch
on my lens to keep it from racking in and out too much when trying to
focus on a bird that's close.
Though shooting at home can be very convenient, there are a number of challenges involved. It's still possible to scare the birds away. I find that I have to be fairly still and not make sudden movements, because the birds can see me inside my house (though surprisingly, a Carolina wren did perch on my window sill at one point and watched me for about 30 seconds before flying off). And then there are the squirrels, who insist on eating all of the bird seed, and cars driving up my road that also scare away the birds. |
|
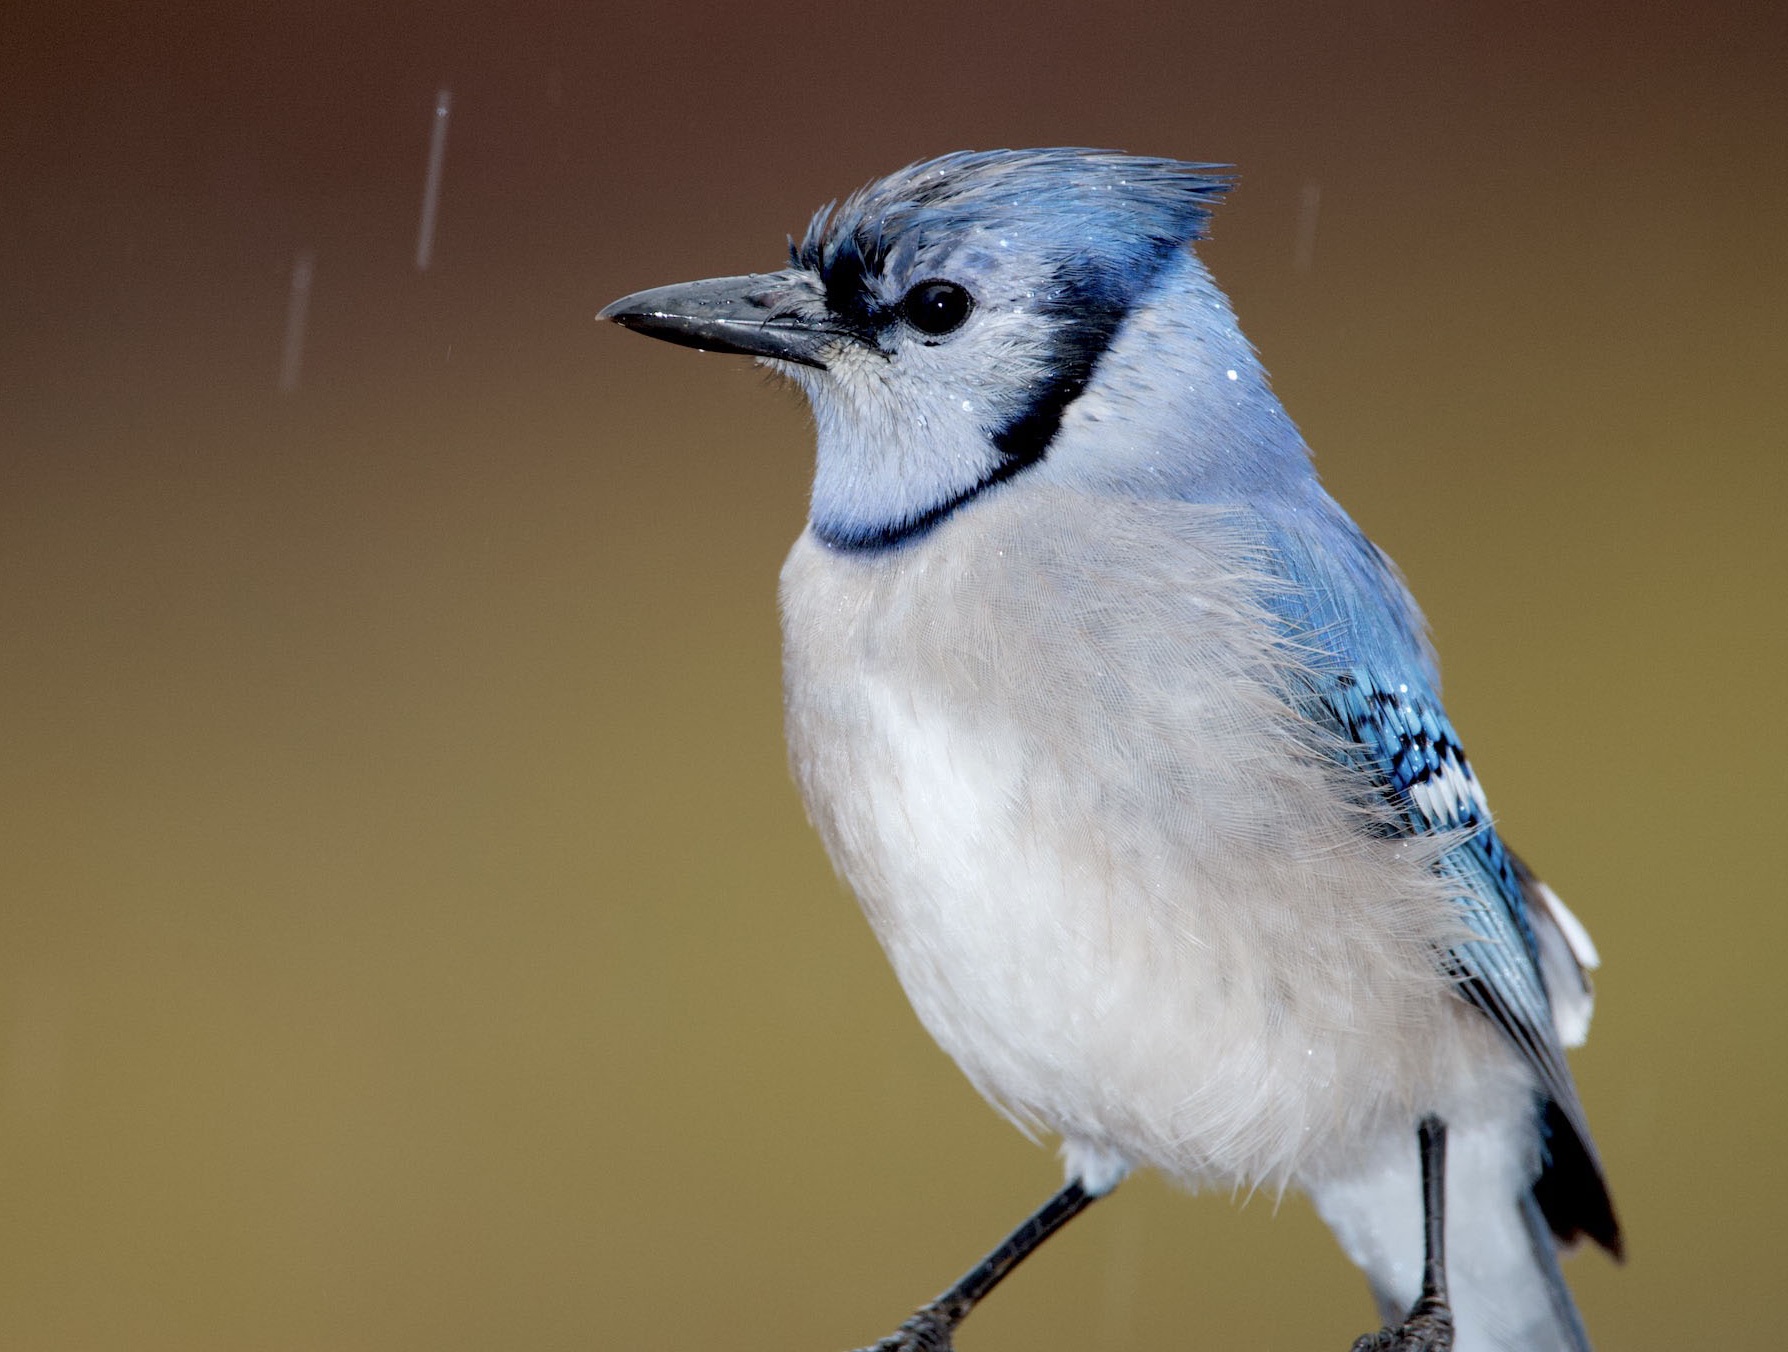
Blue jay in the rain. The bird was
perched on a feeder, which looked unnatural, so I
had to crop out the feeder (and, unfortunately,
the bird's feet). But it was nice to be able to
get this close: normally, blue jays fly away
as soon as they see me coming.
|
|
Another challenge
to shooting at home is that photos of birds at a
bird feeder don't look very natural. One way to
address that is to provide natural perches for
them. I have a wooded back lot with many fallen
branches, so it's easy for me to find a nice
branch that I can mount over the feeder. Then I
just shoot them when they're perched on the
branch, and crop out the feeder if it's in frame.
I use a platform feeder for the seed (and for dried meal worms, which many birds love!), and I have a feeder pole next to that, which I use for mounting a branch with bungee cords. I position the branch over the platform feeder, so that the birds first perch on the branch before going to the feeder. It's natural for them to do so, because birds are inherently cautious — they like to perch high first, to look for predators, before coming down to the food. With a platform feeder you can also place logs and other natural items on the platform for the birds to perch on, for a more aesthetic photo. The bluebird photo at the top of this article illustrates this. For that shot I had a large piece of driftwood sitting on the platform feeder, and I just waited to shoot the bird until it was on the driftwood. |
|
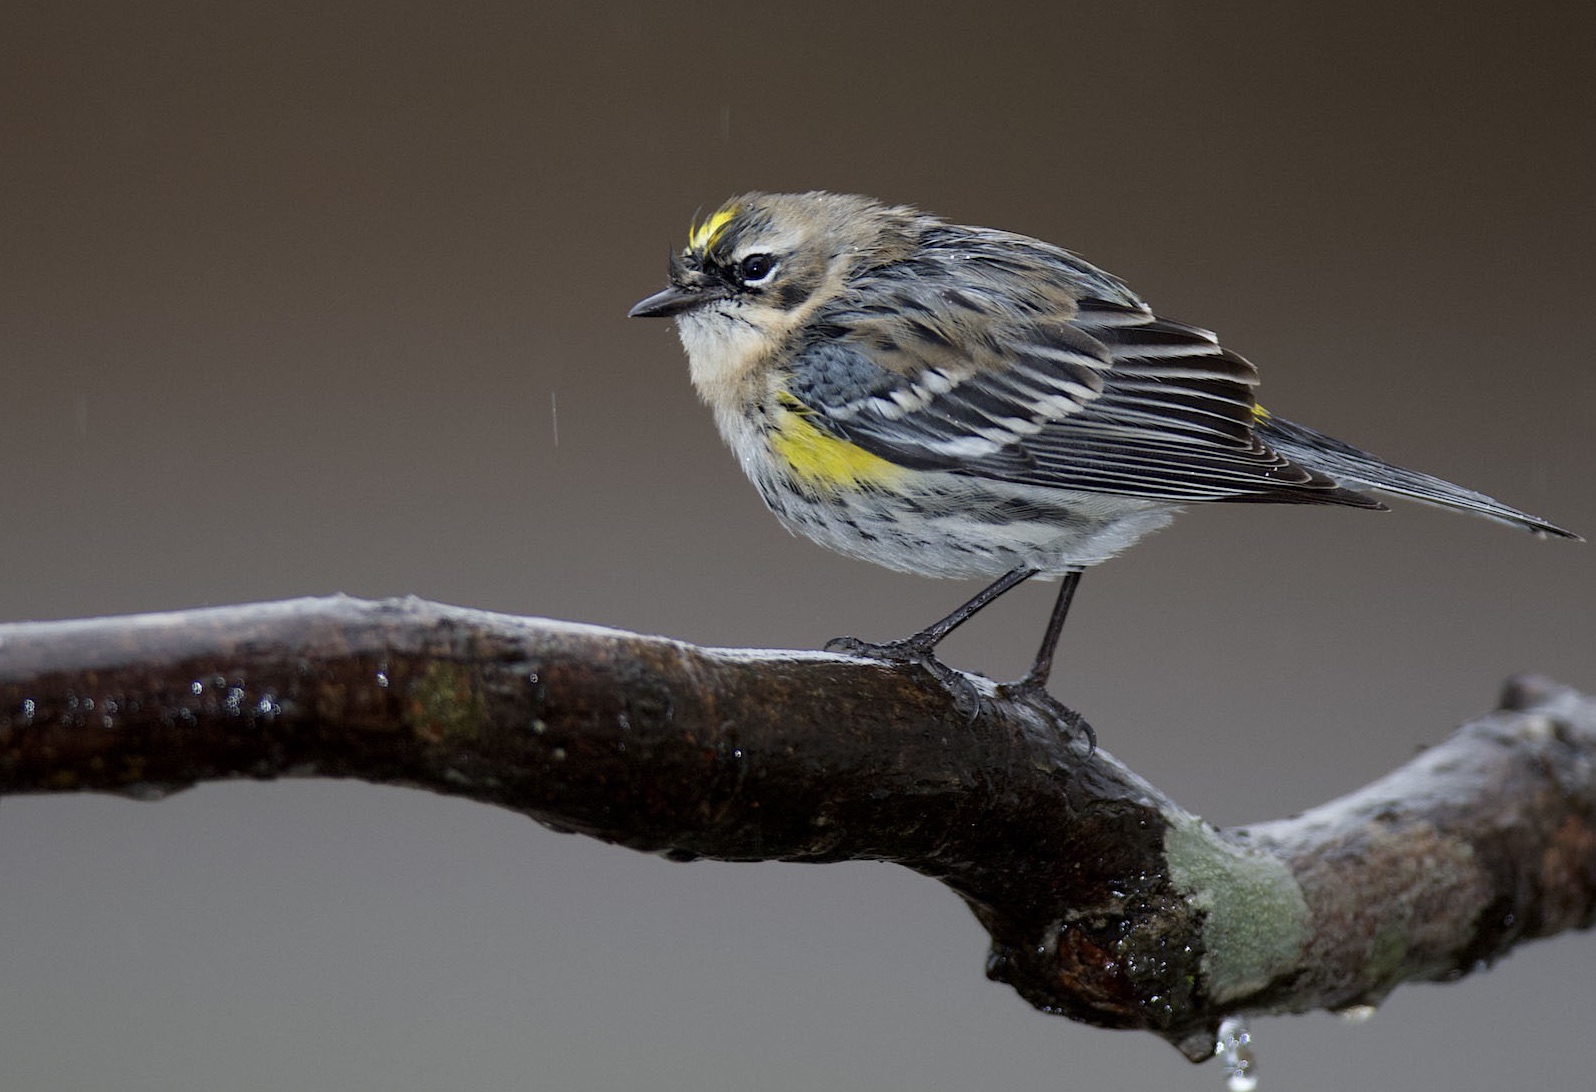
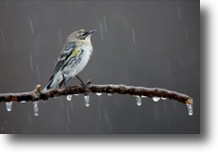
Yellow-rumped warbler in the rain. I
found this branch in my back yard, and mounted it
over the feeder with bungee cords, to provide a
natural perch for the birds. I think this looks a
lot nicer than a bird perched on a plastic feeder.
|
|
It does help to
swap out the branches frequently. Otherwise, all
of my photos end up showing an array of different
birds all perched on the same branch, which looks
monotonous in a photo gallery.
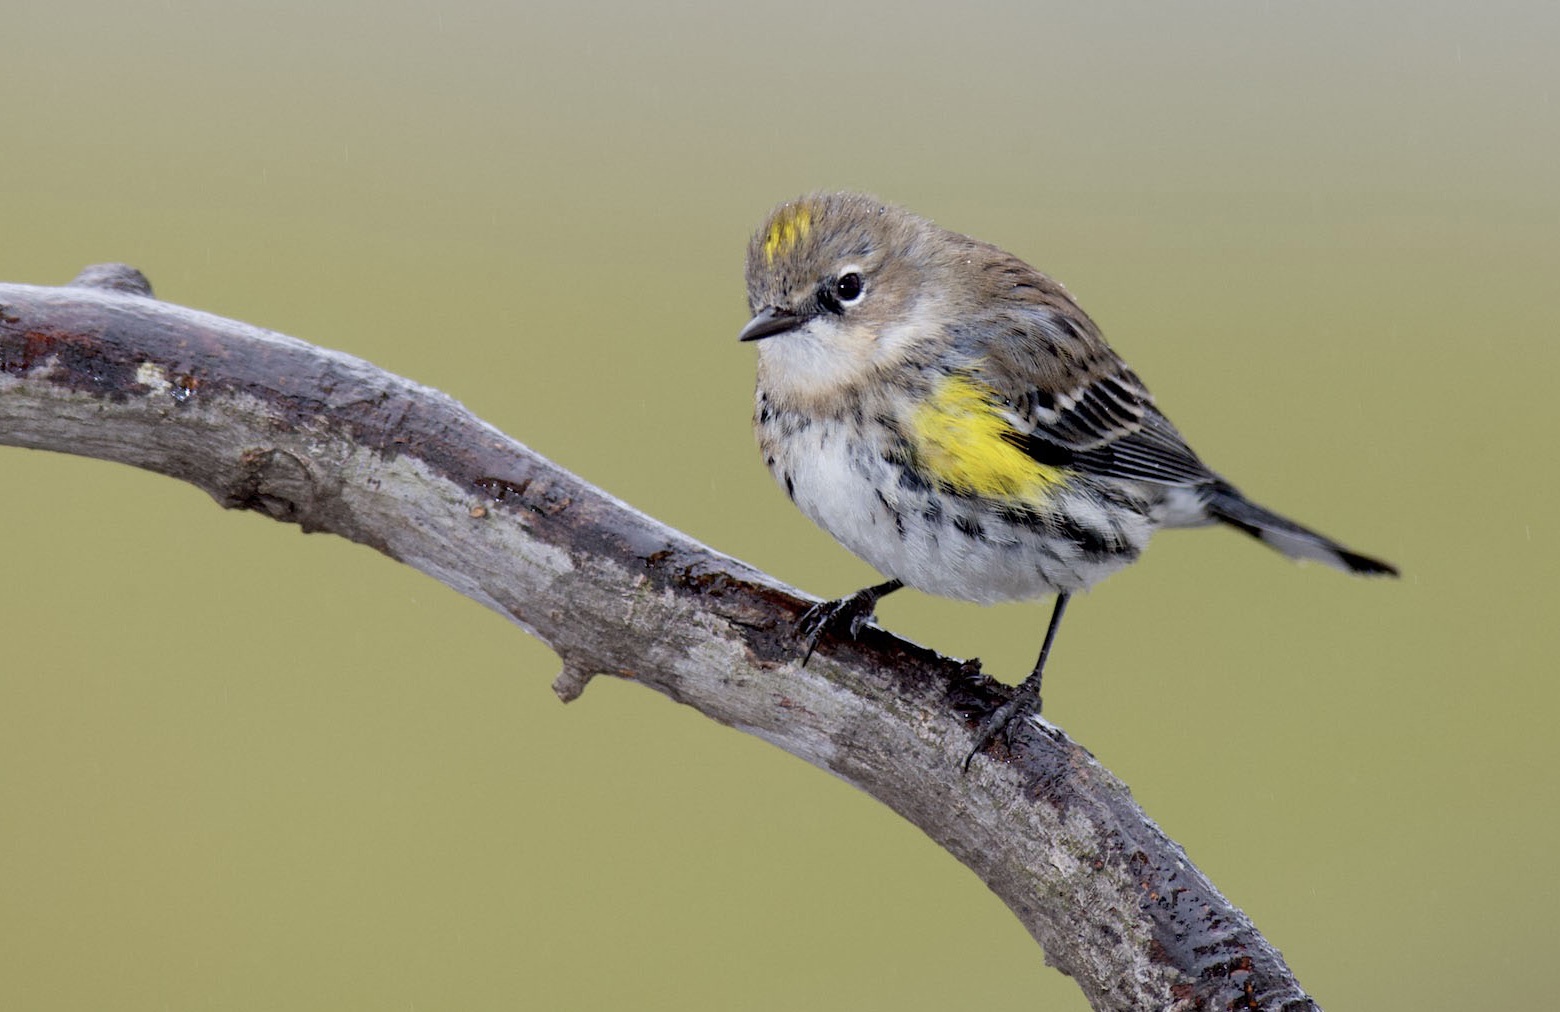
Another thing to be aware of is the background. If you compare the image immediately above to the one below, you'll see that I had different branches mounted over the feeder for those two shots. You'll also notice that the backgrounds look different. This came about naturally, as a result of the shooting angle. In the image above, the gray is from the street and the brown is from my neighbor's mulch, whereas in the image below, the green background is from my neighbor's grass. Moving the branches slightly, and shifting my shooting angle, allows me to get different backgrounds, which also helps to reduce monotony. Unfortunately, I can't easily move my platform feeder. Being able to do so would help me to increase the diversity of backgrounds further. |
|
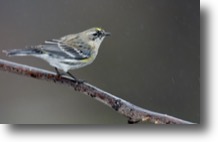
Another yellow-rumped warbler. Notice
that the branch is different from the previous
photo. I try to swap in a new branch before each
shooting session. Also, the background is
different, because the branch was lower and I had
a different shooting angle. All of these things
help to reduce monotony in your photo collection.
|
|
By the time I had
taken the photos above, I was pretty sure my
camera and lens still worked. Five years of being hauled
around in the woods can be tough on gear. And with
lenses it's important to regularly check for
fungus on the glass, because it can irreparably
ruin a lens if it gets inside the housing.
Fortunately, all of my gear still seemed to be in
working order.
And surprisingly, I seemed to remember how to use it. The main challenge for me is always with setting my exposure, since I shoot exclusively in full manual mode (for both the camera and the flash unit). You might expect that to be complicated, but it's really not. Once I set my aperture to wide-open and my shutter speed to the flash sync speed (1/300 sec), the only things left are ISO and flash power. I usually leave my flash power at 1/16 or so, and then all I have to do is turn the ISO up or down as the bird moves between shady and sunny patches. That's not that hard. I just had to re-familiarize myself with the range of useful ISO values, and that only took about an hour. Of course, on sunny days in winter (with no foliage to create shade), it's better to turn off the flash and use high shutter speeds to freeze motion. But on dimly-lit days, or when the birds are heavily shaded, I find flash to be invaluable. Image stabilization (IS) can help with the slow shutter speeds commonly used with flash, though mechanical (in-the-lens) IS can slow down autofocus acquisition, so I rarely use it. And though many flash units support higher shutter speeds through high-speed sync (HSS), I find that HSS reduces my frame rate too much, due to the capacitors draining completely after each shot. |
|
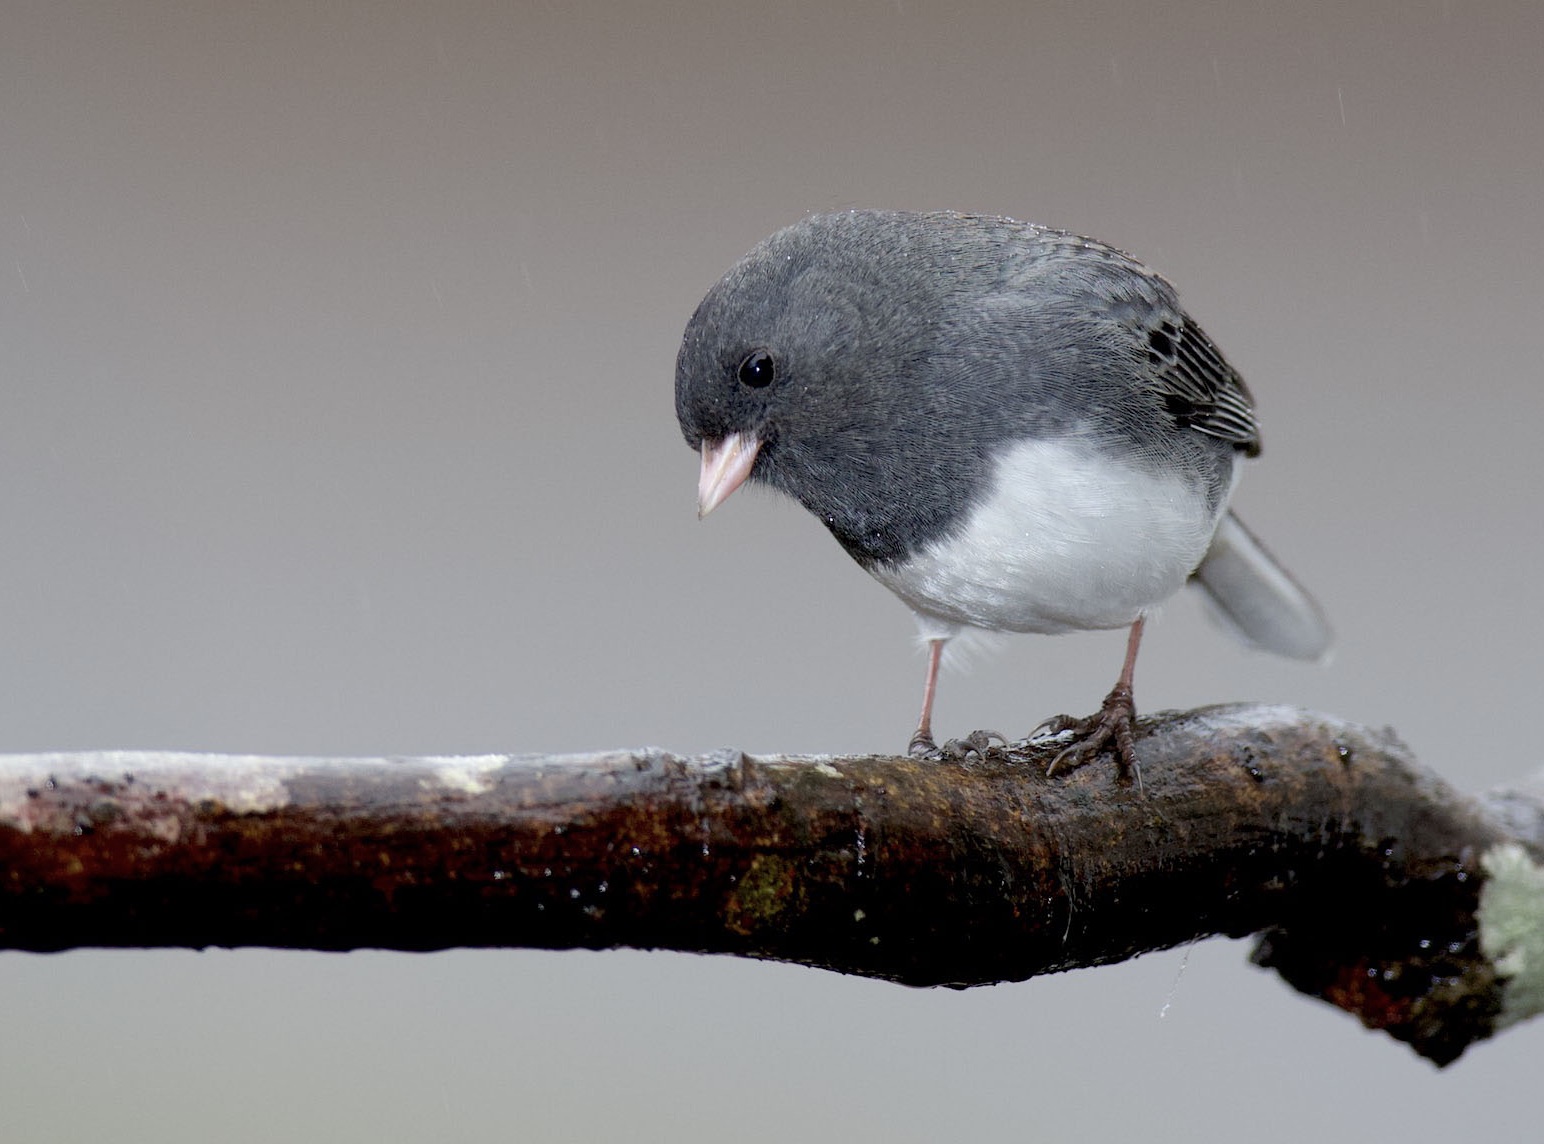
Junco on a poorly-lit day. On birds
with both white and dark patches in their plumage,
exposure can be challenging, because if you expose
for the dark areas, you can blow the highlights in
the whites, while exposing for the whites can sacrifice
detail in the dark areas. Flash can help by
bringing out details in both.
|
|
Flash not only lights up the scene on
dark days, it can bring out colors more richly
than ambient light, and it accentuates
microscopic details in bird feathers. In the junco
photo above, notice that there's a lot of detail
even in the pure white area of the bird's
underside. With just ambient light, that might
show up as a uniform white blob, but because flash
consists of strong, unidirectional light, it
accentuates fine details by reflecting
from minute feather surfaces at different angles. That fine detail is then picked
up by the camera's sensor, and gives the
impression of a sharper image.
Despite the many advantages of flash, it has its limitations. It's only effective at short ranges (due to physics), it sometimes creates red-eye or steel-eye in birds, and it does eat up a lot of battery juice. Perhaps the greatest limitation is that for effective flash photography, I find it best to use my camera's sync speed of 1/300 sec, to maximize flash output and conserve battery juice. That speed of 1/300 sec is very slow, and results in many photos being discarded due to motion blur. For these reasons, I've been wanting to experiment with using high ISO to brighten up dark scenes rather than flash. The photo below was taken without flash, and you can see that the color and detail are acceptable, though there was some direct sunlight on parts of the bird, which helped. This photo was taken using a highly portable rig that consisted of a 400 mm f/4 lens with a 1.4x teleconverter, for an effective focal length of 560 mm. That's a nice focal length to have in a compact, lightweight package, and really makes for an ideal hiking lens. Note that while a high-quality (meaning expensive) 1.4x teleconverter can give you a nice magnification boost without reducing image quality too much, a cheap TC can result in a noticeable loss of sharpness. And I generally don't recommend using 2x teleconverters. |
|
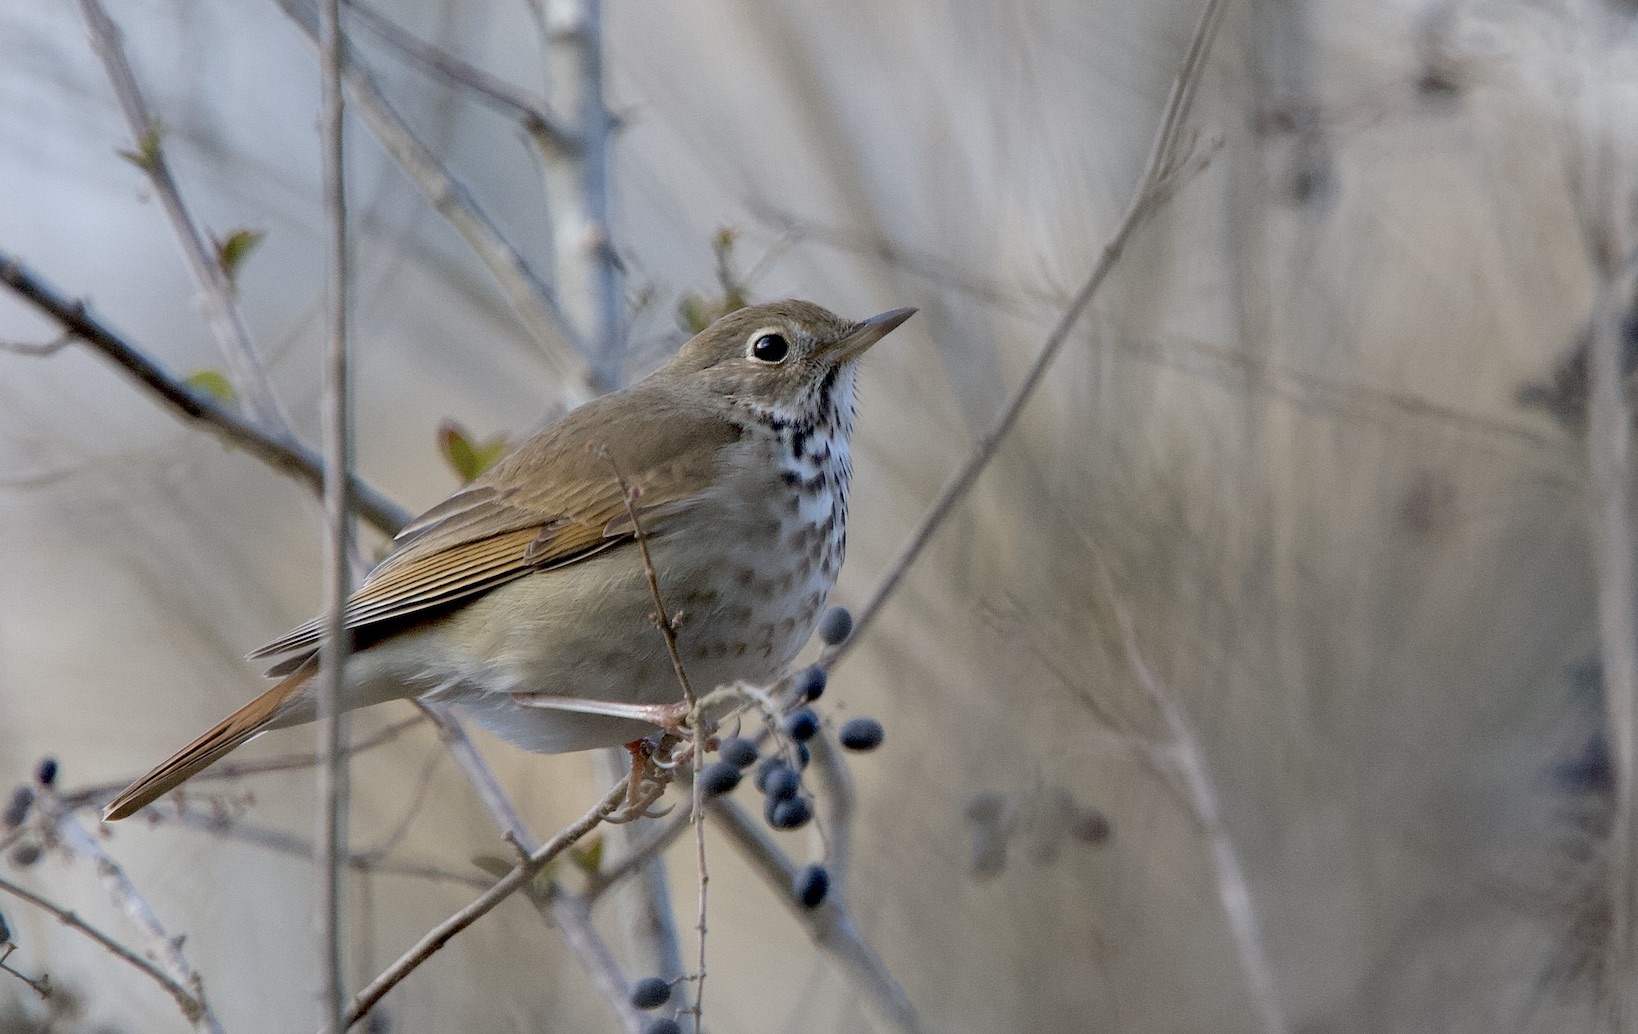
Hermit thrush shot with a 400 mm f/4
lens + 1.4x TC, no flash, and my old 10 MP
camera. Though the old body wasn't great at high
ISO shooting, this looks remarkably noise-free
given that it's ISO 1250. That's great for a
13-year-old camera. But today's high-end cameras can
use much higher ISOs than that.
(560 mm, f/5.6, 1/300 sec, ISO 1250) |
|
In terms of using
higher ISO rather than flash, my 13-year-old
camera doesn't perform as well as today's newer
cameras at high ISO. For that reason, I decided to
upgrade to one of the newer models. The camera I
ended up going with is a full-frame model, as
opposed to my older crop camera that had a sensor
smaller than 35 mm.
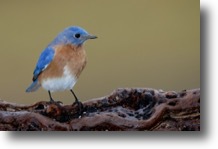
There are advantages and disadvantages to full-frame cameras. Because they spread the photosites across a wider area, they're sometimes described as providing less "reach" or magnification. In my case, because I was coming from a 13-year-old camera, I found that the newer body actually provided more detail and effective reach, basically due to 13 years of technological innovation. The new body has a 25% higher pixel density, a better anti-aliasing filter, and more accurate autofocus, all of which result in more detailed images. The bluebird image below was one of my first shots with the new camera. I've been pretty impressed with the new camera's autofocus speed and accuracy. |
|
Bluebird shot with the new 20 MP
camera. Comparing this to the next image, I don't
think there's more detail here. The old 10 MP
camera was already remarkable.
|
|
Though the new
camera does capture more detail on birds, it's
still only a 20 megapixel camera. That's a
doubling compared to my old 10 MP camera, but it's
still nothing compared to some other models
available today at 45 MP or more. Personally, I
think that 20 MP is enough, because at some point
the camera becomes limited by the resolution of
the lens and my ability to hold the camera still
(and to control movement of the bird).
If you compare the bluebird image above with the bluebird image below, ignoring the difference in lighting, you'll hopefully agree that both images show about the same amount of detail in the bird, despite that the image above was taken with the 20 MP camera and the one below was taken with the old 10 MP camera. I actually think it's astounding how good the photos from a 13-year-old camera can look. The newer camera is certainly better, but in many cases I have to look pretty hard to see the difference. Also keep in mind that higher megapixels can come at a cost to image quality. Packing more photosites on the sensor means having to include more electronic circuitry (which can cause thermal issues and electromagnetic interference), and those photosites will typically be smaller, resulting in fewer photons collected per site. All of these can result in increased per-pixel noise. Thus, with higher MP ratings you get more pixels, but they may be noisier pixels. The tradeoff between more pixels and more per-pixel noise can only be accurately assessed by comparing cameras in the field and seeing which one performs better in practice. |
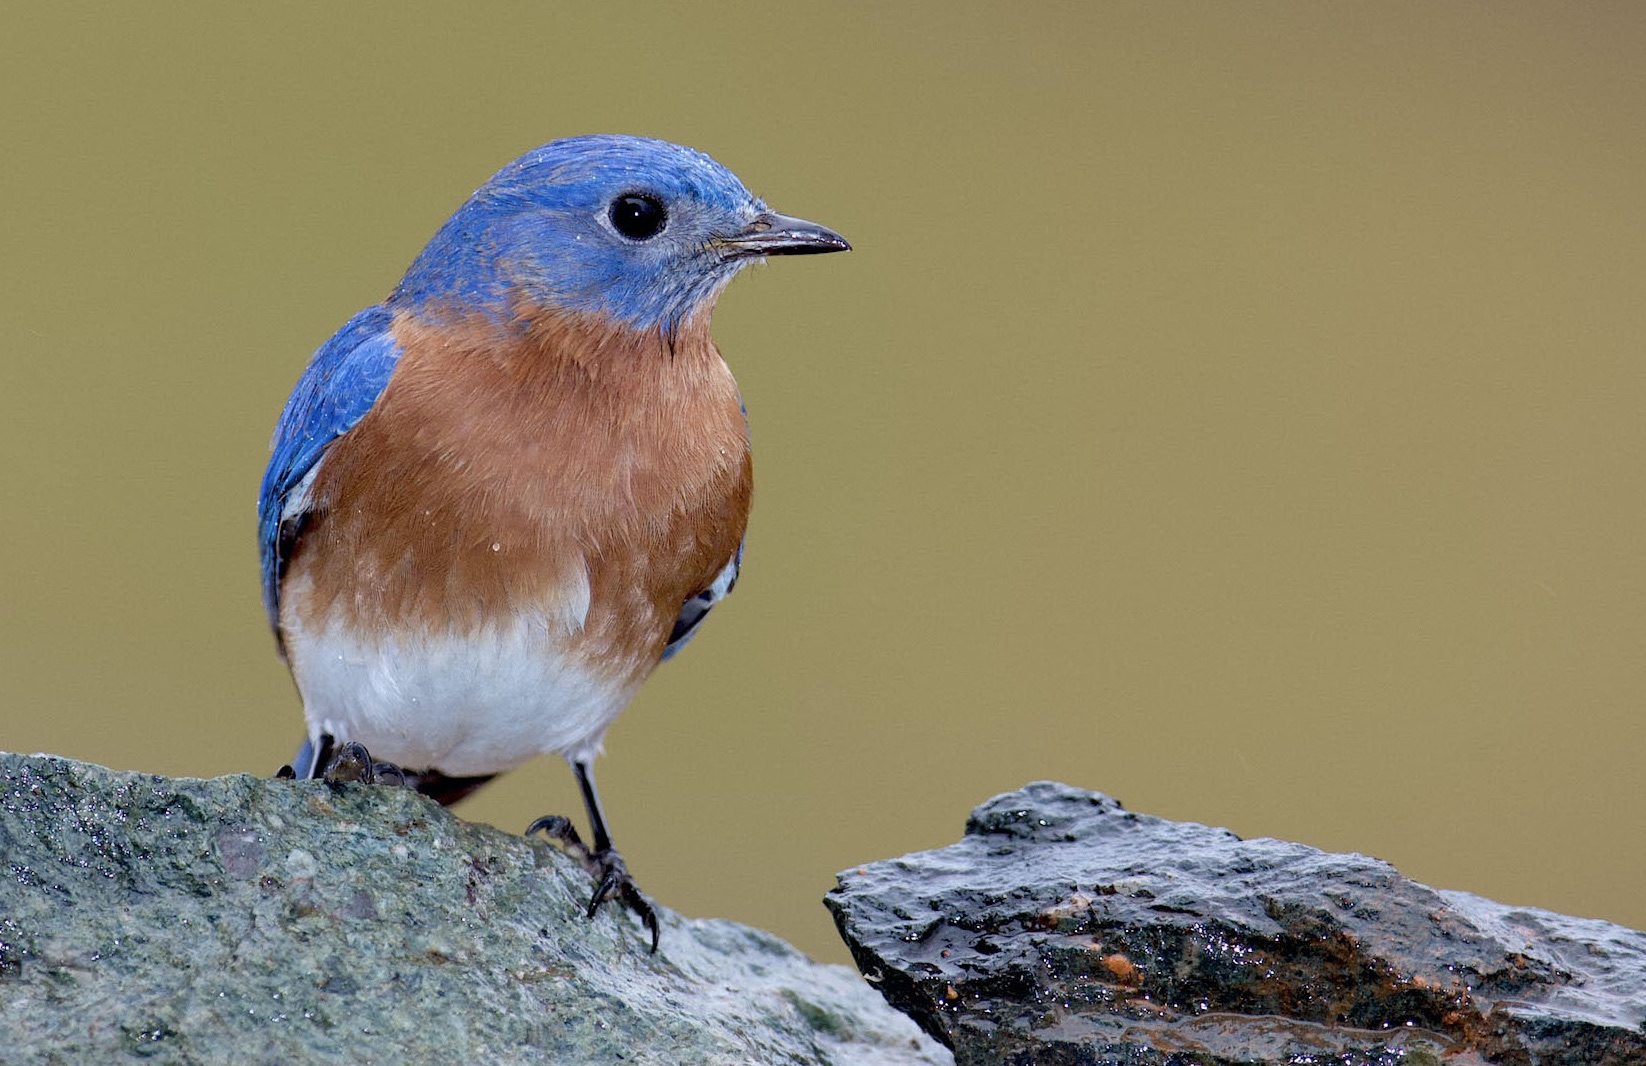
|
Bluebird shot with the 13-year-old, 10
MP crop camera. I don't think I'm seeing any less
detail here than on the 20 MP image above. But
maybe I would if I zoomed in on both
images. I have found the 20 MP images to be more
croppable, in general.
|
|
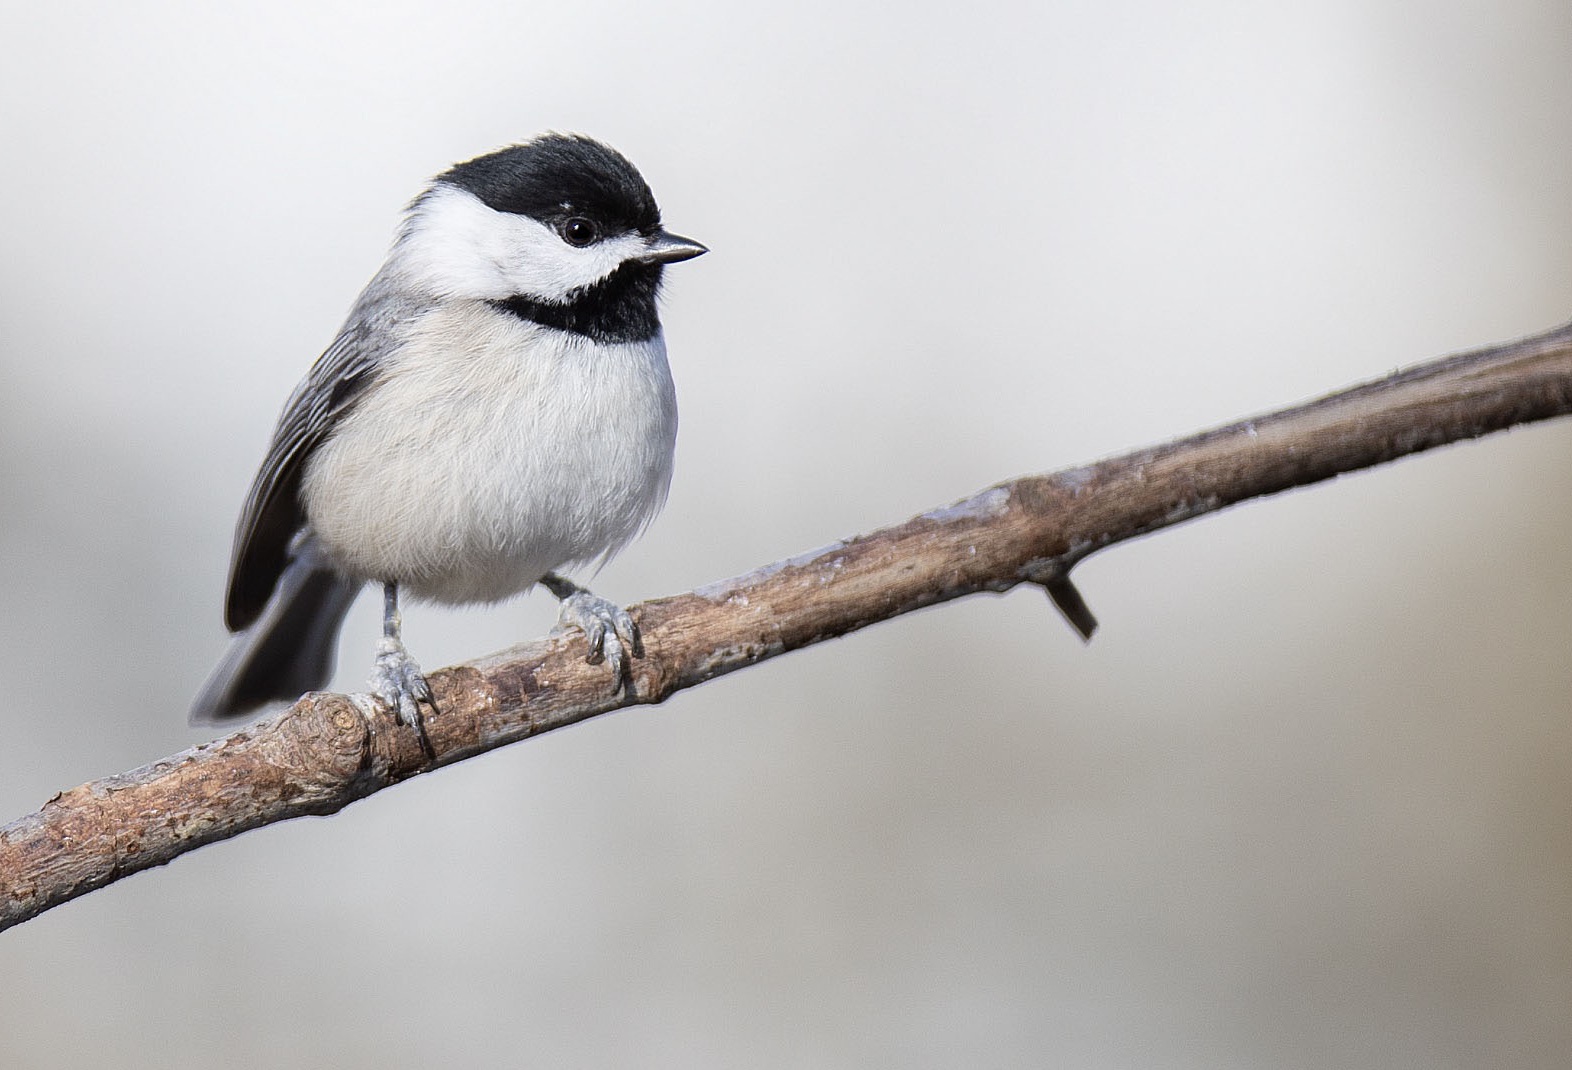
In terms of
full-frame versus crop cameras, I haven't been in
a big hurry to upgrade to full-frame, though I now
see that there are some advantages. For example,
with a bigger sensor it's possible to spread the
photosites out, and/or make them bigger, resulting
in cleaner images with greater dynamic range. The
chickadee image below illustrates this. Despite
being a high-key image, there's detail in all
parts of the scene, including in the very bright
areas, due to a very large dynamic range. And by
the way, I recommend always
shooting in RAW
format, since that can help to retain the dynamic
range of your camera during postprocessing.
In some cases, a full-frame camera may also have faster and more accurate autofocus, because the AF sensors effectively have a wider window for collecting information they can use in figuring out how to adjust the focus on the lens. I've definitely noticed that my new full-frame camera can focus much faster, and more accurately, than my old 1.3x crop camera. Fast and accurate autofocus is extremely important for bird photography. I lose many potential shots due to incorrect focus. This is especially problematic for fast-moving birds, and birds in a complex scene with many branches to distract the camera's AF system. Camera companies are still devising new ways to improve their AF systems, and this newest model I've been testing certainly shows that they've made big improvements. Some newer models now make use of artificial intelligence to detect animal and bird faces (though mine doesn't), and I would imagine this could have a huge impact on AF accuracy for wildlife photography. |
|
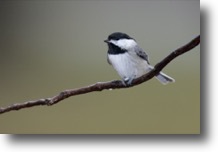
Chickadee shot with the new full-frame
camera. Notice how much detail there is in the
bird, and the smooth gradients in the background.
A full-frame camera with moderate MP can have big
photosites that capture lots of photons and
produce very clean images with high dynamic range.
|
|
One thing to
consider when shopping for a new photography rig
is the expected life of the camera. The fact that
I'm still getting great images through my 13-year-old
gear is a testament to the fact that camera
life is important. Just because Canon or Nikon or
Sony have come out with a newer, fancier model
doesn't mean that your old camera is now obsolete.
That's why when I bought my old camera I sprung for the more expensive professional body rather than the consumer-grade model. The pro bodies from Canon and Nikon are built like tanks, because they're designed to be used by hard-working professionals who abuse their equipment by taking it out in the real world day-in and day-out. My 13-year-old pro body looks horribly beat up, but it still functions flawlessly, and I attribute that to its superior build. In the camera world, you tend to get what you pay for. With this newest camera, I expect to get at least 10 years of use out of it, which is why I opted for the more expensive model. Keep in mind that low-end cameras are typically rated for about 100,000 shutter actuations, whereas some pro bodies are rated for 500,000. It's actually fairly easy to burn through that many shutter actuations with a digital camera, especially if you shoot at high frame rates (which I don't). Though I do recommend considering used gear if that helps you get a better camera, you also need to consider whether your camera will need a shutter replacement after the manufacturer stops servicing that model. Some companies, like Canon, won't service a camera or lens older than about 10 years. |
|
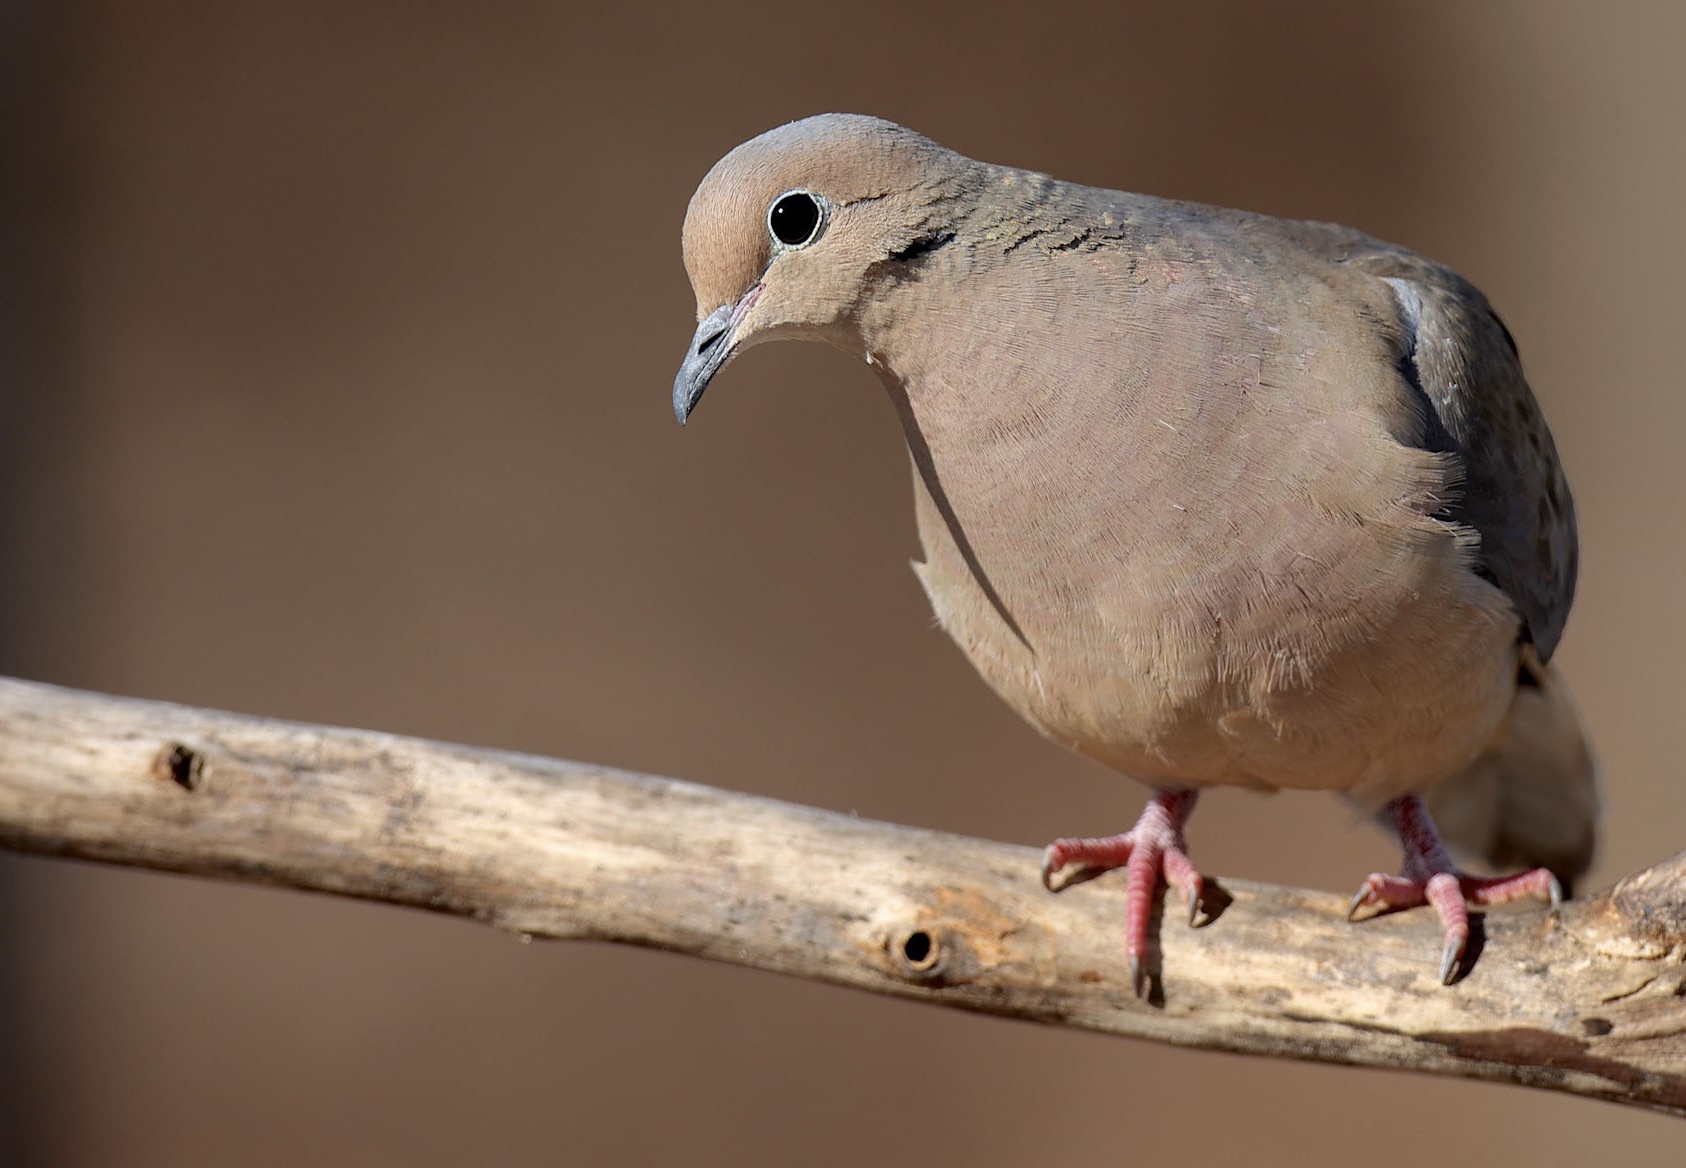
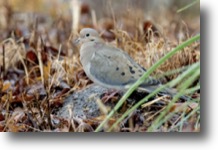
Mourning dove shot with the new, 20 MP
full-frame camera. I didn't realize before how
much detail there is to be seen in these birds.
But I don't think that's because of the 20 MP, and
I doubt whether higher MP would add any more
detail. The photo is highly detailed because I was
close to the bird, and I was using a sharp lens.
|
|
In summary, I'm
happy to report that while my old gear still seems
to be working fine, the new full-frame camera has definitely
been an upgrade, and with its greater capabilities
it promises to transform my photography. As of
now, I think I'm glad I decided to resume this
very challenging (and sometimes rewarding)
hobby.
Bird photography is very difficult, and I still think the greatest impediment to getting great bird photos is not the camera or the lens, but my ability to find the birds, frame them with a pleasing background, and to get close enough for a sharp, frame-filling shot. Better technology can help, but at the end of the day, I still think the most important things are patience and persistence. |
|
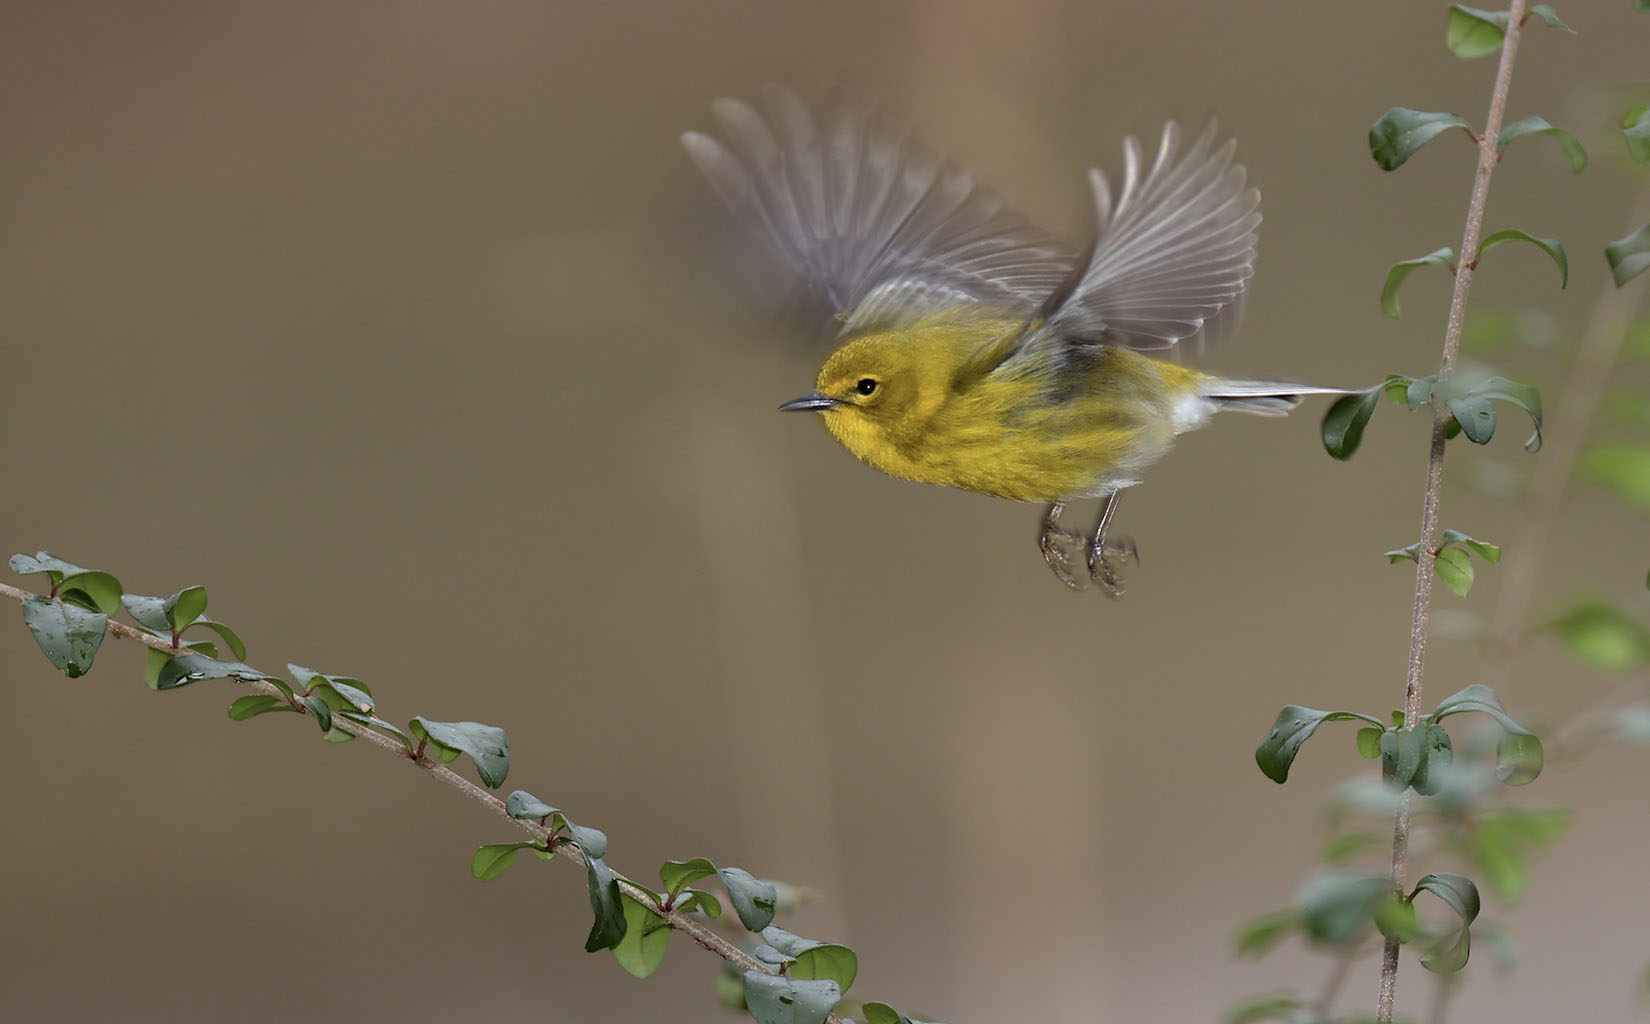
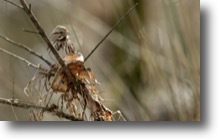
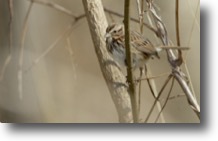
Pine warbler in flight. Shooting
songbirds in flight is nearly impossible in many
situations, because they move so quickly. I got
this shot by luck, because the bird flew just as I was
trying to shoot it. Though I was shooting at 1/250
sec (a very slow shutter speed), the flash froze
the bird (almost).
|
 |
 |
 |
 |
 |
 |
 |
 |
 |
 |
 |
 |
 |
 |
 |
 |
 |
 |
 |
 |
 |
 |
 |
 |
 |
 |
 |
 |
| |
|
||
|
Photos taken with the full-frame camera: |
|||
 |
 |
 |
 |
 |
 |
 |
 |
| FREE eBooks by W.H. Majoros: |
|
 CLICK TO DOWNLOAD FREE PDF |
 CLICK TO DOWNLOAD FREE PDF |
